Quickstart
This quickstart guide will help you create and run your first add-on, a simple hello world add-on built with plain JavaScript.
Introduction
Check out this short video below for a quick visual introduction to the steps you'll take to create your very first add-on.
Prerequisites
- NodeJS (major version of 16 or greater) and npm (major version of 8 or greater) installed
- Familiarity with programming in HTML, CSS and JavaScript
- An Adobe Express account (use an existing Adobe ID or simply create one for free).
Add-on CLI
The Adobe Express add-on CLI (Command Line Interface) is required for add-on development and allows you to create and host Adobe Express add-ons directly from your local machine.
Step 1: Create your add-on project
Open your terminal and run the following command:
Copied to your clipboardnpx @adobe/create-ccweb-add-on hello-world --template javascript-with-document-sandbox
This command will create a new add-on based on pure JavaScript with Document Sandbox support (the set of APIs that allow you to interact with Adobe Express documents).
hello-worldis the name of the add-on you are creating.- The
--templateflag specifies the template to use for the add-on; in this case,javascript-with-document-sandbox. The parameter is optional, and when missing, the CLI will prompt you to choose one from a list.
The Templates section on the Development Tools page provides a list of available options; if your add-on doesn't need to manipulate documents, you may want to pick a sandbox-free template (e.g., javascript instead of javascript-with-document-sandbox).
For Windows Users: If you're using the CLI in the terminal, you'll need to add openssl to the path under Environment Variables. If git is installed, openssl can be found at C:\Program >Files\Git\usr\bin. Otherwise, you can download git from https://git-scm.com/downloads, and add the directory location to the path variable in your Environment Variables.
npx is an npm package runner that can execute packages without installing them explicitly.
Please run this command to clear the npx cache and ensure the latest version of the CLI is invoked.
Copied to your clipboardnpx clear-npx-cachenpx @adobe/create-ccweb-add-on hello-world
The above may prove useful when updated versions of the CLI are released. If you want to read each individual CLI command manual page, run them via npx with the --help flag, for example:
Copied to your clipboardnpx @adobe/ccweb-add-on-scripts start --help
Step 2: Build and start your add-on
Next, execute the following commands to change into the newly created hello-world add-on folder, build the add-on, and start the add-on in a local server:
Copied to your clipboardcd hello-world;npm run build;npm run start;
The start script will display messages like the following after it executes:
Copied to your clipboardDone. Your add-on 'hello-world' is hosted on: https://localhost:5241/You can now sideload your add-on by enabling the Developer Mode in the Add-ons panel.
Step 3: Enable add-on development mode (first-time only)
- Navigate to Adobe Express.
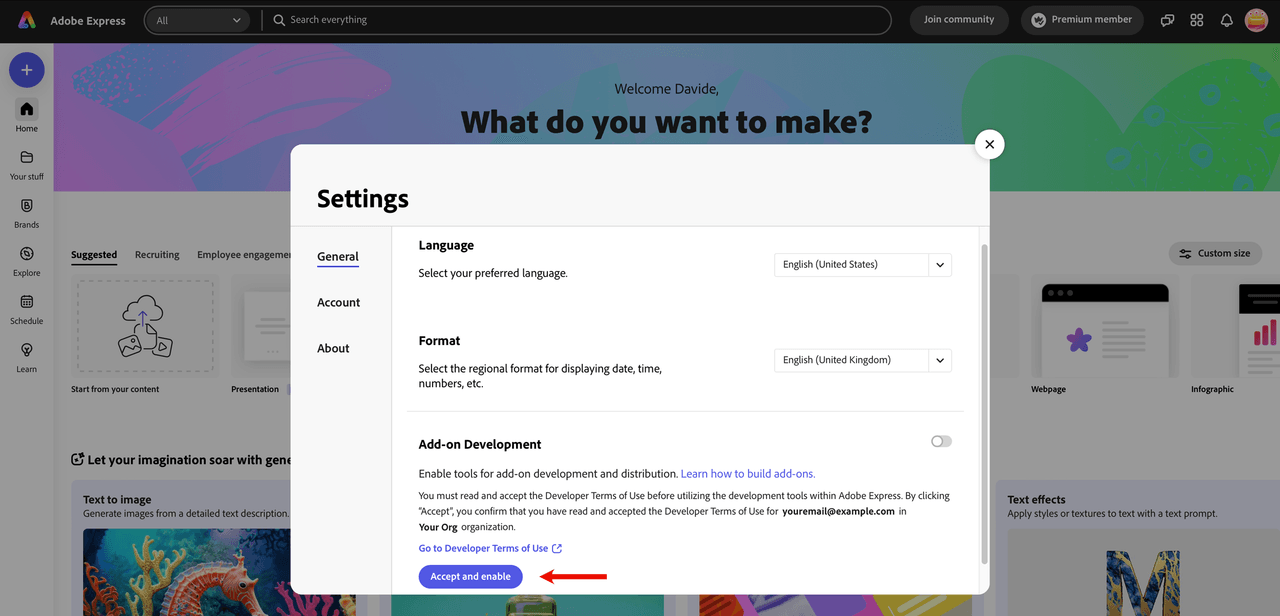
- Click on your user avatar in the top righthand corner and choose Settings.

- If you haven't already, click the Accept and Enable button to enable the add-on development switch (which is grayed out). Clicking the "Go to Developer Terms of Use" will open them in a new tab.
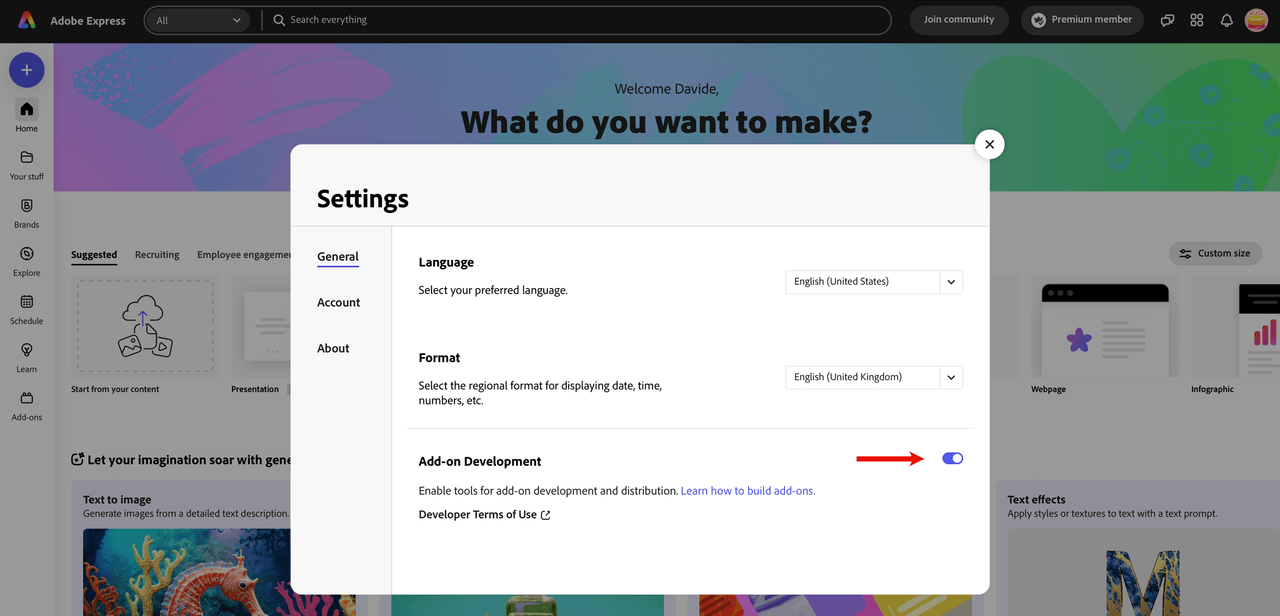
- When you have accepted the terms of use, the switch becomes available and should be toggled on.
Step 4: Load and run your add-on
- Navigate your browser to Adobe Express and create a new project—a blank one will suffice.
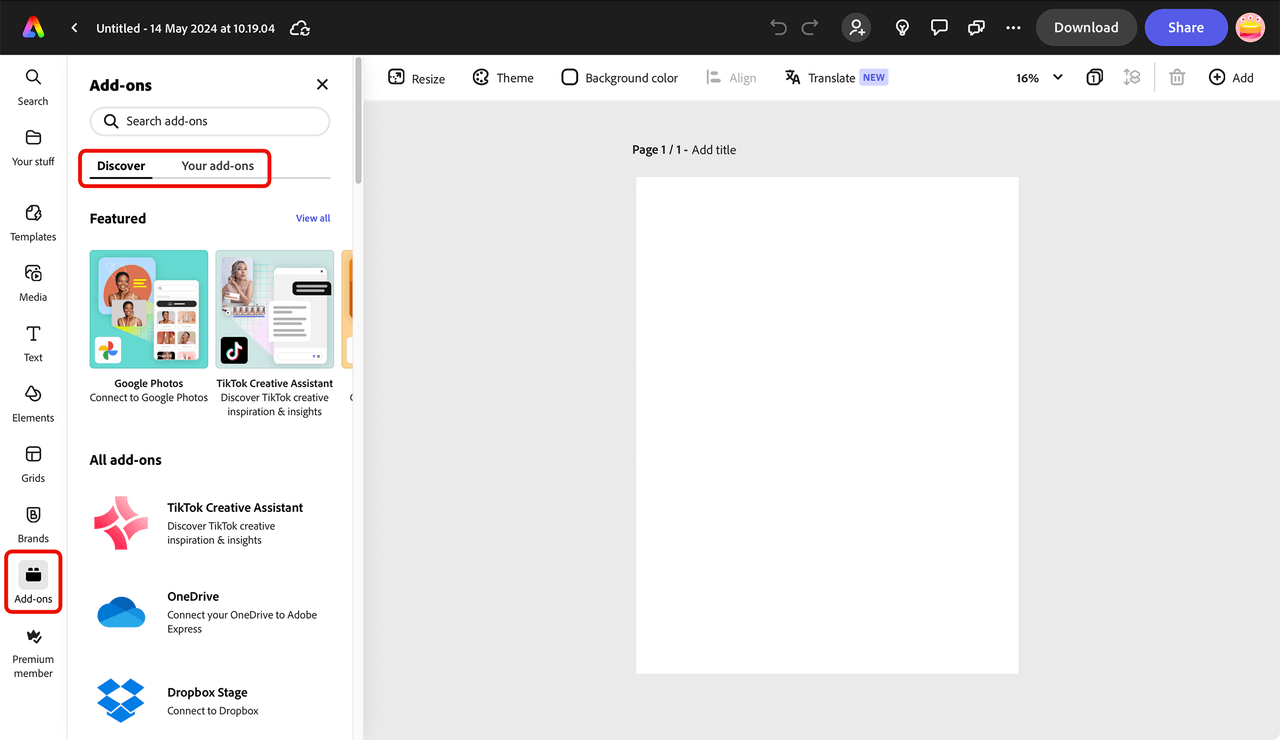
- Click the Add-ons icon on the left rail.
It's possible to access the Add-ons from the home page as well (i.e., without the need to open a new project first). In this case, you must follow the listing creation outlined here first.
For simplicity's sake, this Quickstart guide covers the document creation method.
- Notice there are two tabs: Discover and Your add-ons.
- Click on the Your add-ons tab to access the Add-on Development tools panel, and toggle on the Add-on testing switch.
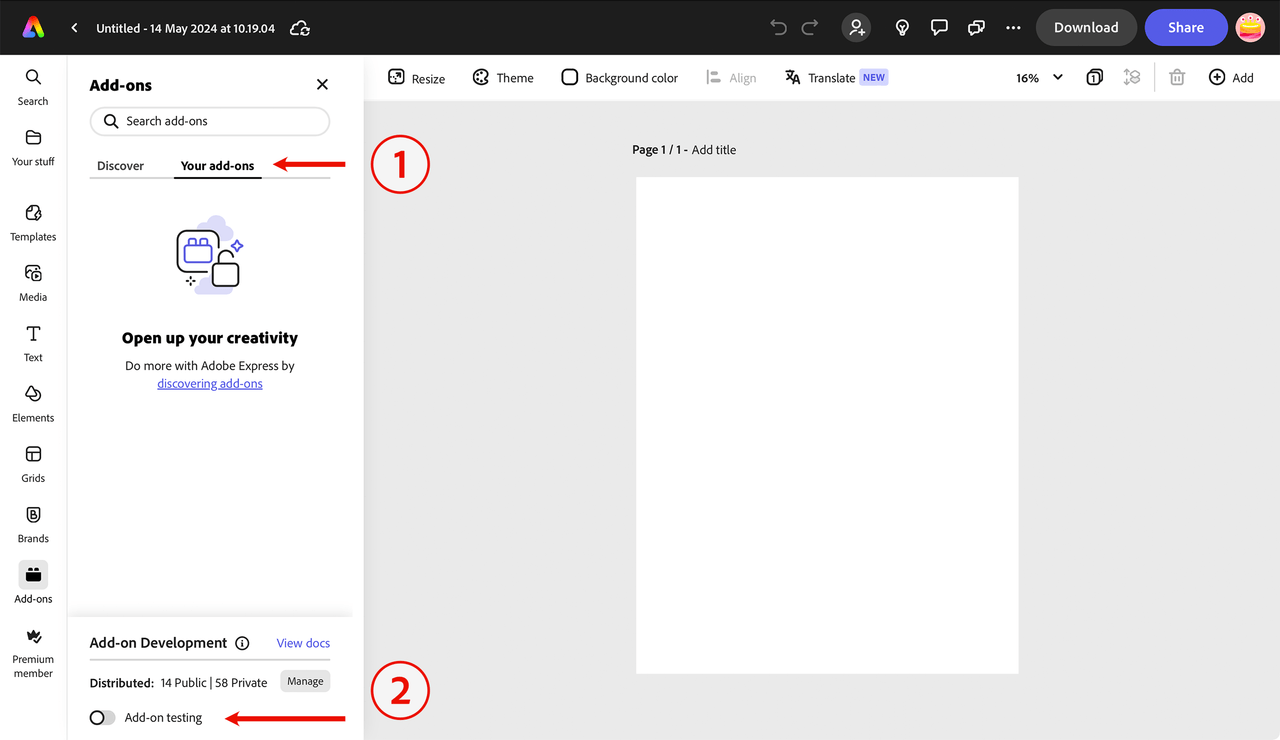
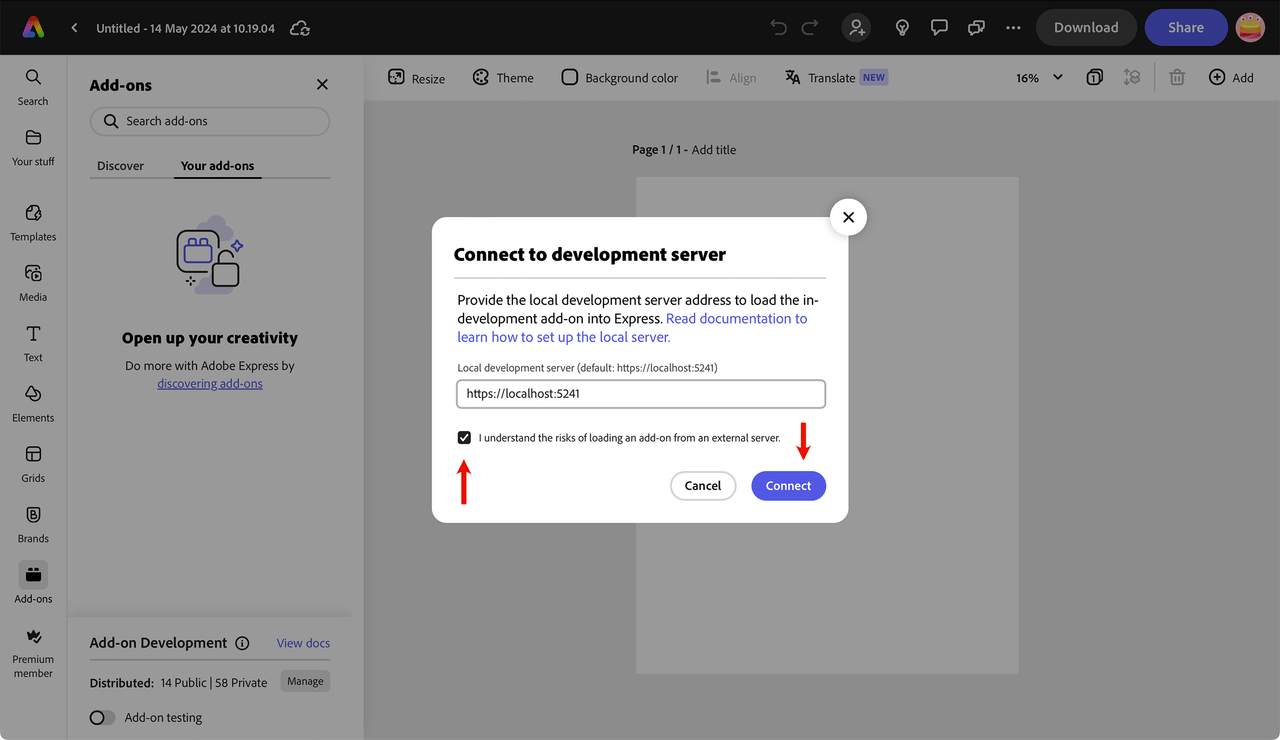
Once clicked, a modal will appear where you will provide the URL of your locally hosted add-on.
Note: Use the default
https://localhost:5241supplied unless you are intentionally using a different port.Select the I understand the risks of loading an add-on from an external server checkbox and press the Connect button.
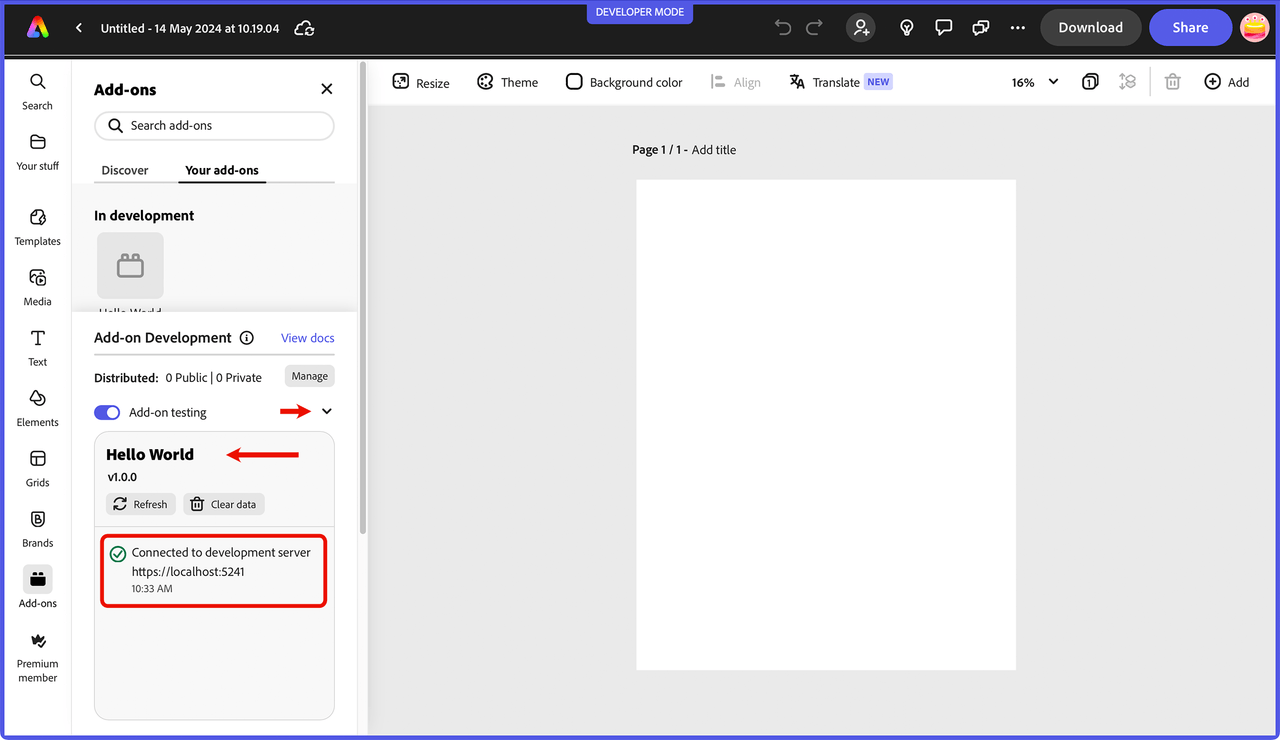
- The Add-on Development panel will expand and show a message that the add-on is connected in the log, along with the name and version of your add-on. You can click on the down arrow icon to collapse the panel.
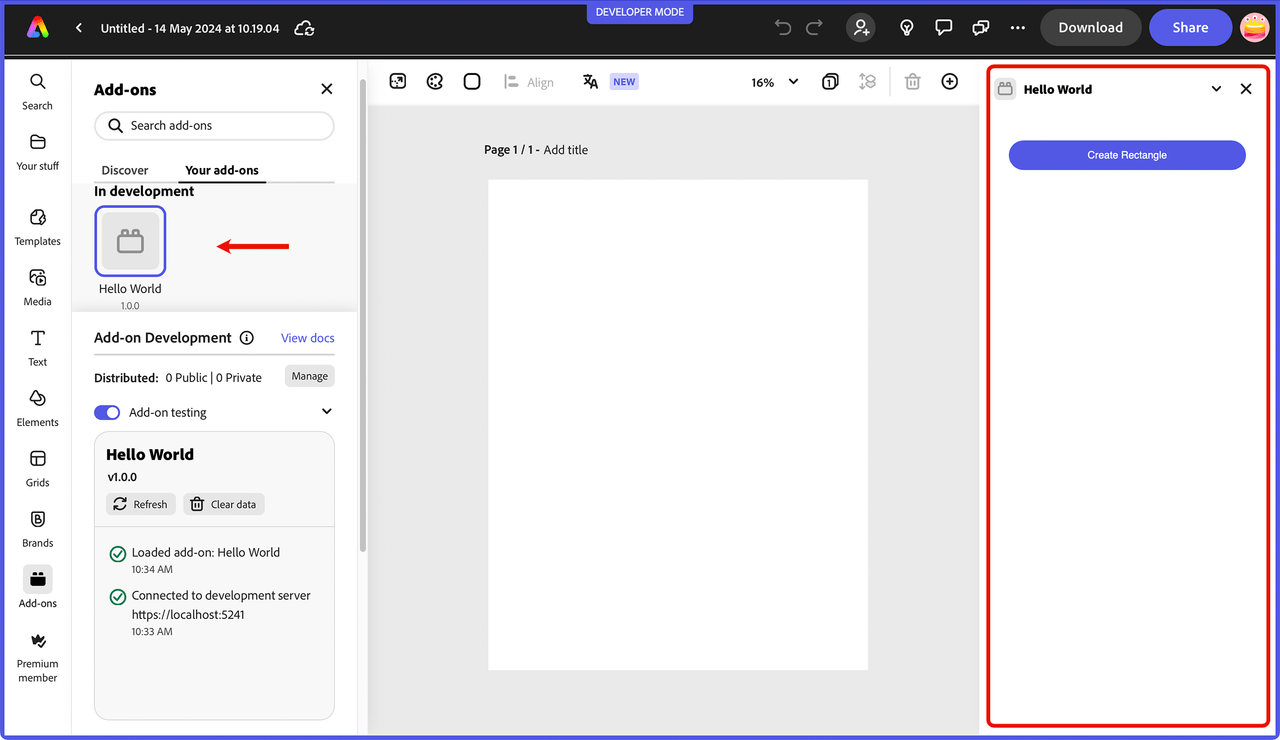
- To run your add-on, simply click on it from the In development panel. Your add-on should now be displayed in the add-ons panel on the right side of your Adobe Express window:
Step 5: Edit your add-on
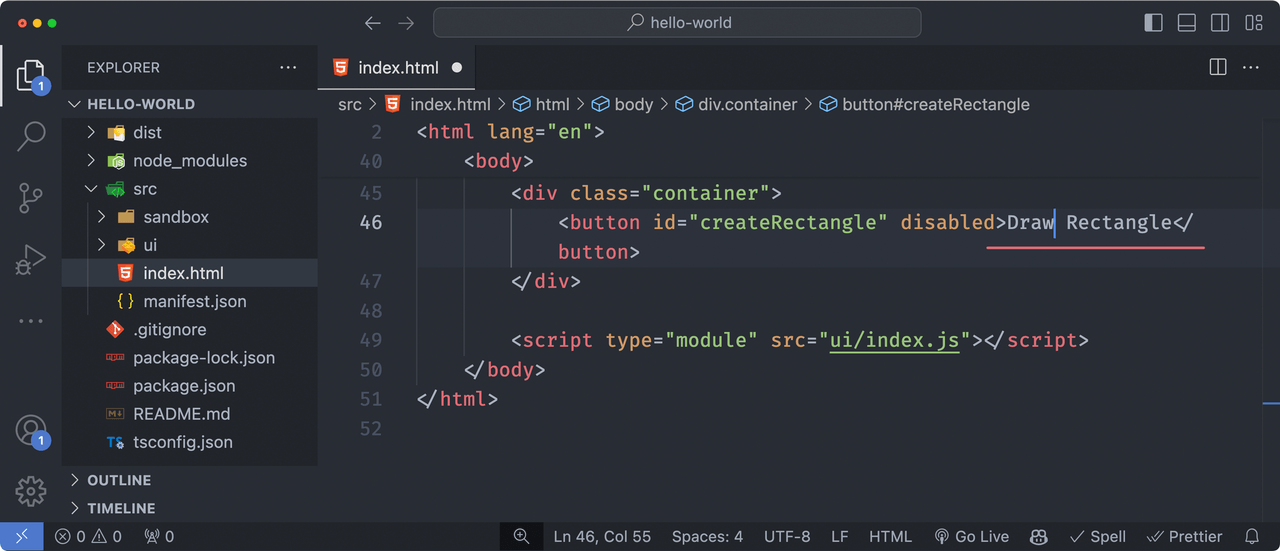
While your add-on is still loaded and running, open the src/index.html file and update the "Create Rectangle" string in the <button> below.
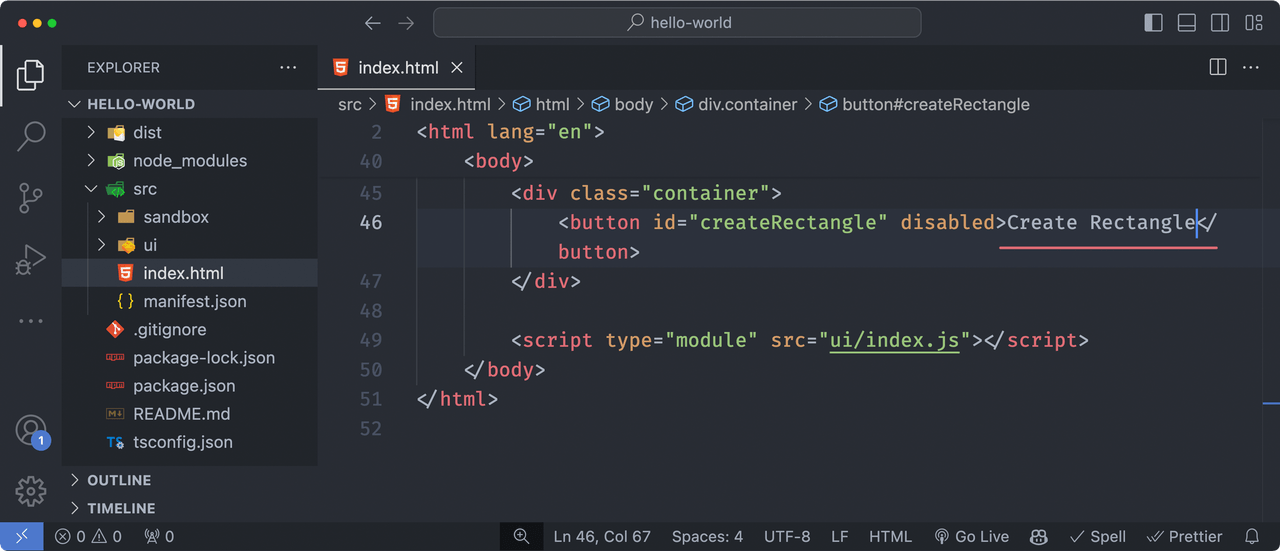
To something else, like "Draw Rectangle".
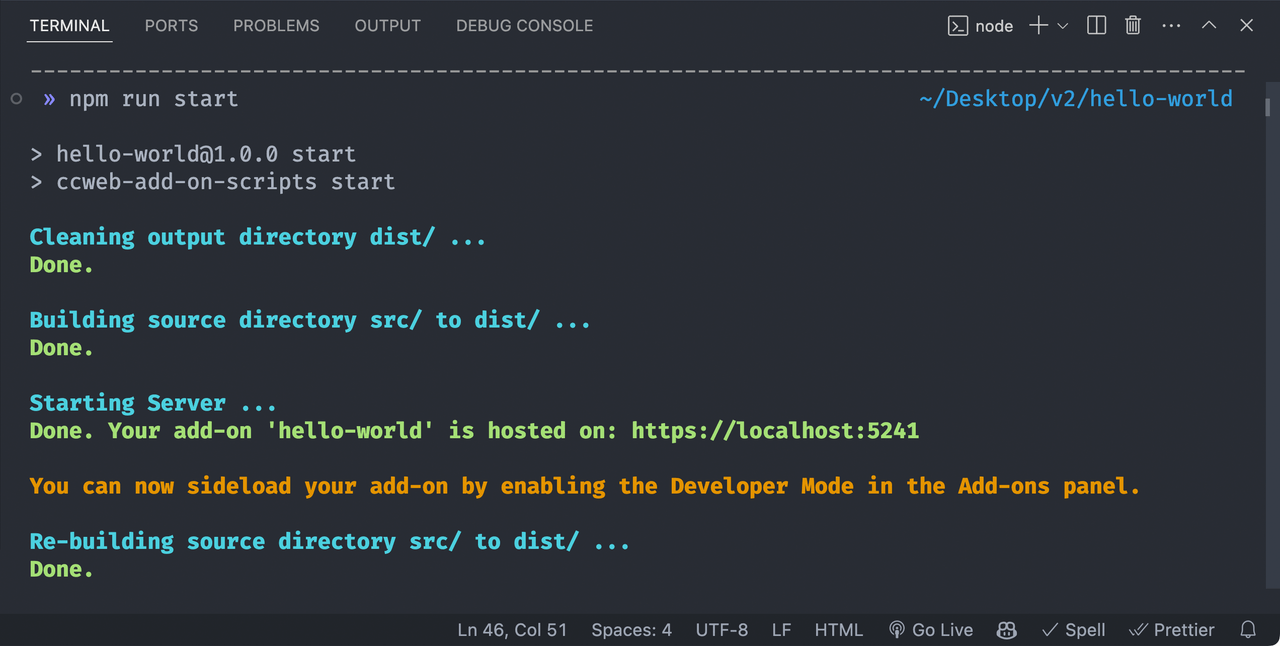
Note that the terminal where your add-on runs will display messages showing that the src has been rebuilt, as shown in the screenshot below. This is due to the hot module reload feature built into the CLI.
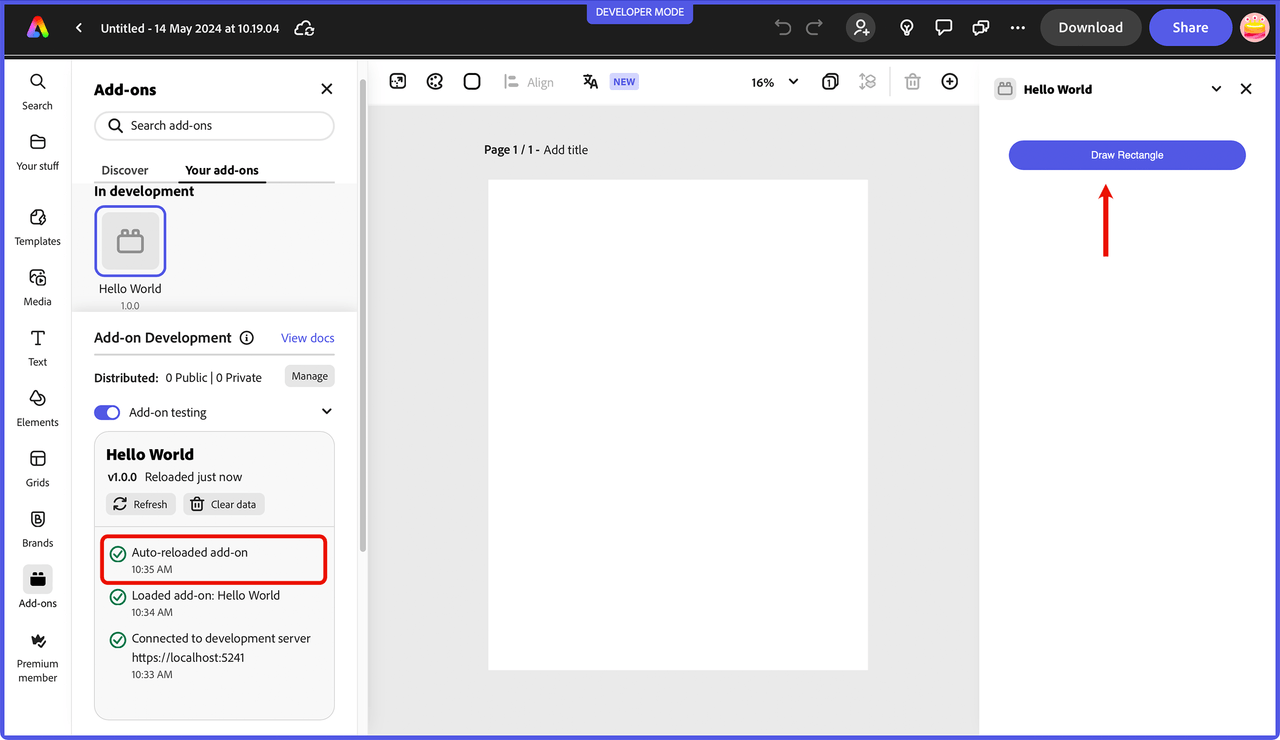
Go back to your browser where the add-on is running in Adobe Express and notice the new string is automatically updated, and the Add-on Development panel shows that it was auto-reloaded.
You can continue to update your code while your add-on is running, and the add-on will automatically be rebuilt on save.
Manifest updates
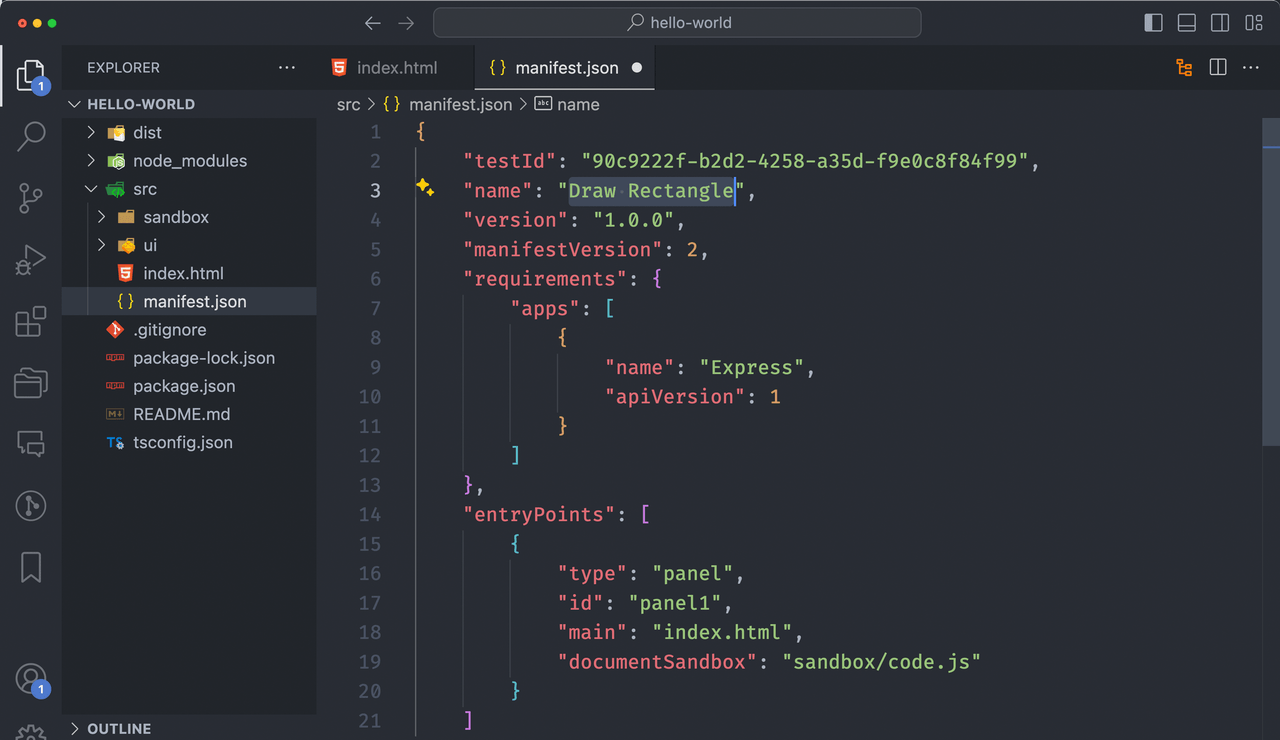
Any changes to the manifest.json will require a manual reload of your add-on. The Add-on Development panel will indicate this in the log messages, and the Refresh button can be used to reload the add-on directly within Adobe Express. You can try this by updating the name field in the src/manifest.json file of your running add-on from "Hello World" to, say, "Draw Rectangle".
Then, switch back to your Adobe Express window, and you should see a message that changes have been detected in your manifest.
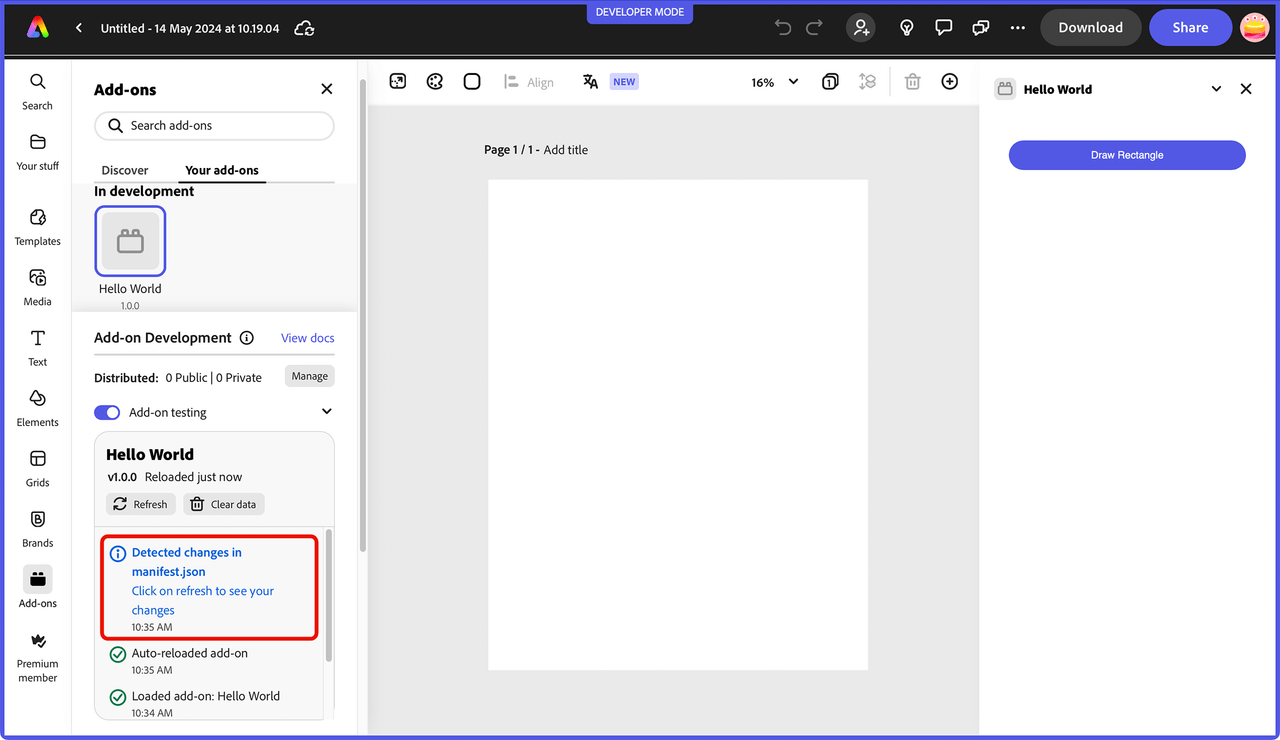
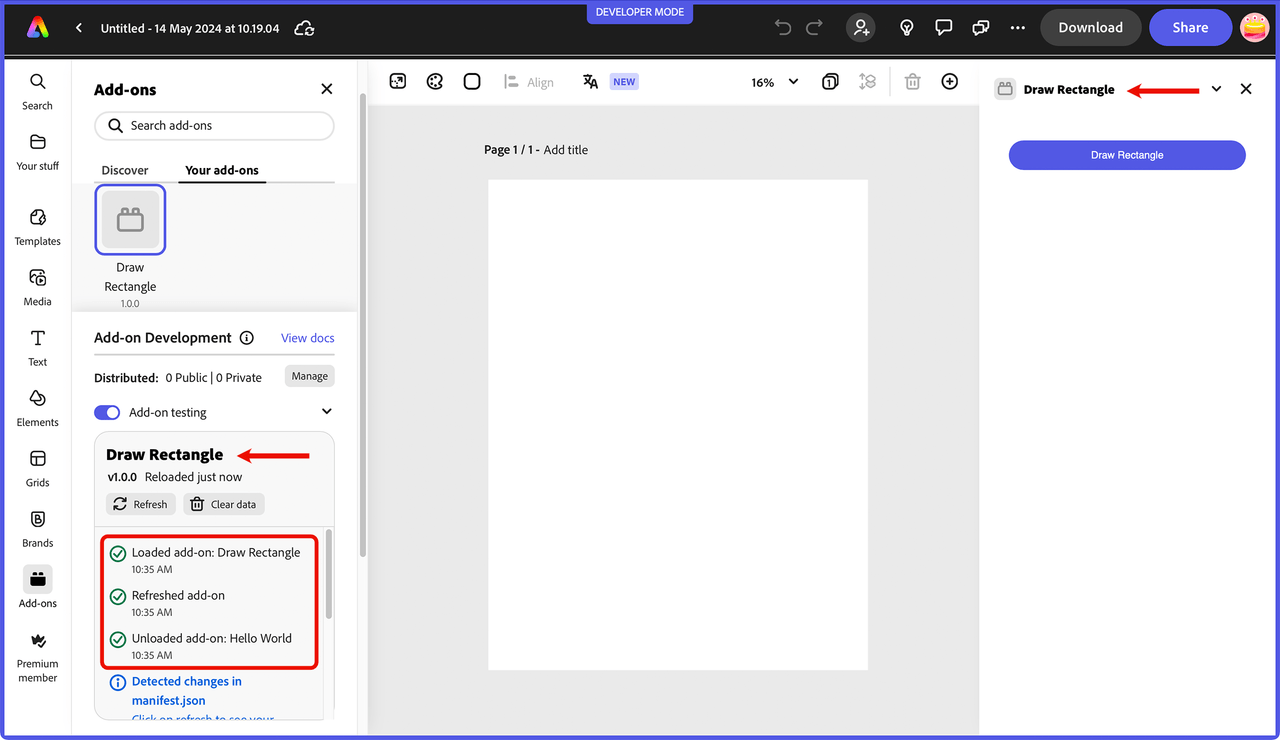
Click the Refresh button, then click your add-on icon to load it again, and note the updated name in the title of your add-on as outlined below.
Next steps
Congratulations! You've completed the quickstart and run your first add-on!
Next, check out the development tools page to discover more details on topics to be aware of while building add-ons, followed by the rest of the guides section, where you will find in-depth resources for designing, developing, debugging and distributing your add-ons.
If you're ready to dive into our developer platform, we highly recommend following the tutorials, and exploring our collection of code samples. These samples provide hands-on examples of how to use our platform SDKs and APIs and are a great resource to help you get started building your own add-ons.

