Code Playground - Add-on Mode
Add-on Mode in Code Playground allows you to develop and test complete add-ons with user interfaces directly in Adobe Express, without setting up a full development environment.
What is Add-on Mode?
Add-on Mode provides a complete development environment where you can:
- Build user interfaces with HTML, CSS, and JavaScript
- Test add-on functionality in a real Adobe Express environment
- Prototype complete add-ons before building full projects
- Iterate quickly on UI and logic
When to Use Add-on Mode
Use Add-on Mode when you want to:
- Develop and test a complete add-on directly in Adobe Express
- Prototype an add-on before building a full project
- Iterate quickly on your add-on's UI and logic
- Build user interfaces around your functionality
- Test the complete add-on experience
How to Use Add-on Mode
Step 1: Select Add-on Mode
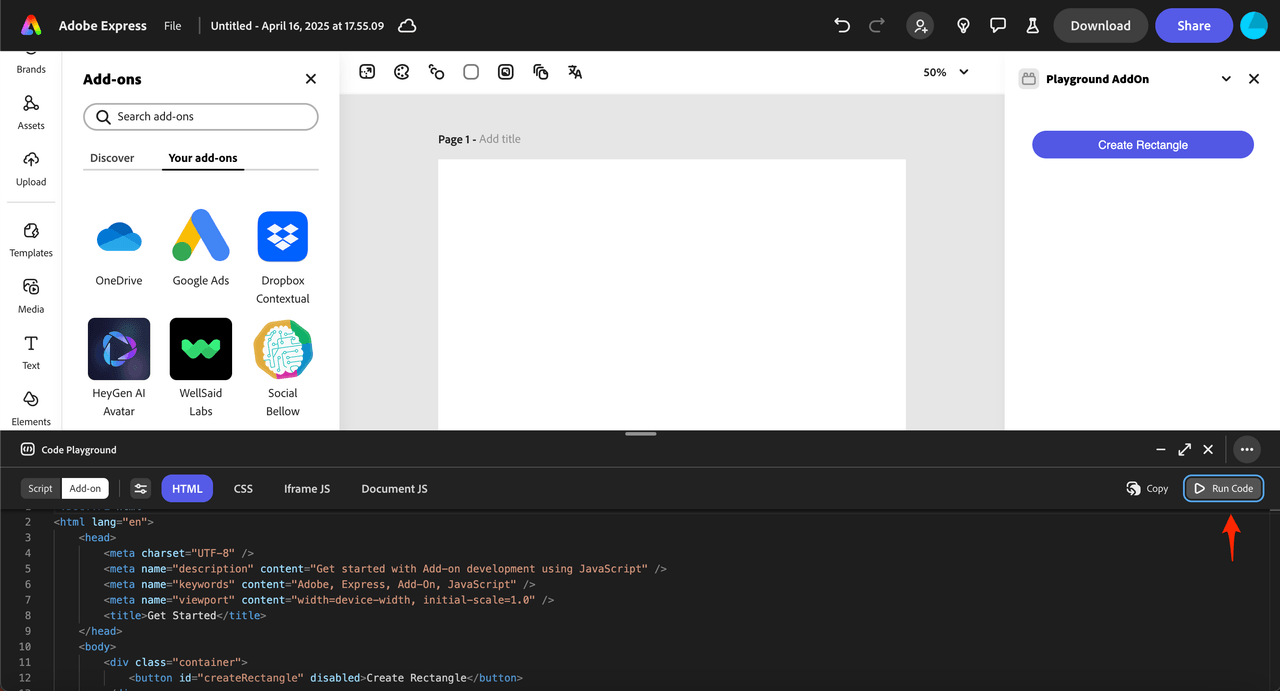
- Click the Add-on button (next to the Script button in the top left corner of the playground window)
- You'll see four tabs for organizing your code: HTML, CSS, Iframe JS, and Document JS

Step 2: Write Your Code
Write code for your add-on in each of the supplied tabs. This includes HTML, CSS, and JavaScript code that will run in the iframe UI or in the Document Sandbox to interact directly with the Express document.
Step 3: Execute Your Add-on
Click Run Code to execute your add-on. Your add-on should open in an iframe on the right side of the Adobe Express window.
Step 4: Configure Manifest Properties (Optional)
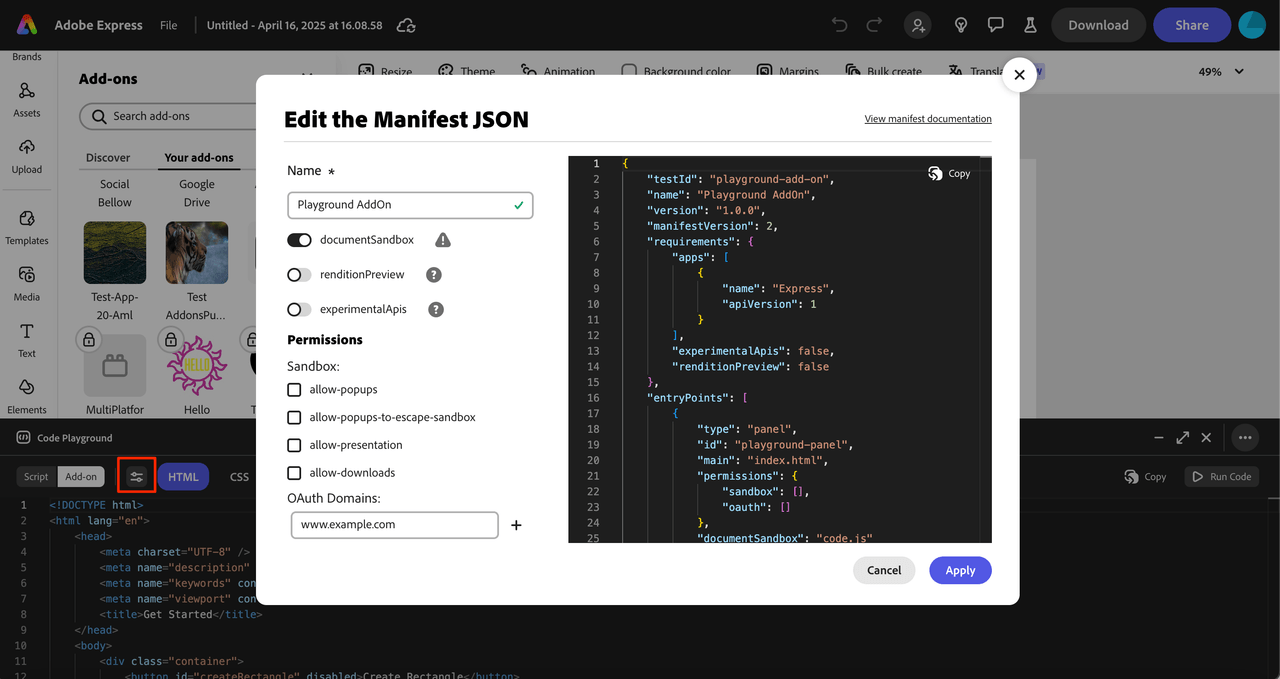
If you need to set manifest properties for your add-on (e.g., if you want to use APIs that are currently marked experimental, set permissions, OAuth domains etc):
- Click on the properties icon to open the Manifest JSON editing modal
- Configure the necessary properties

Understanding the Tabs
The Add-on mode features four tabs for organizing your code:
1. HTML Tab
This tab is for writing HTML code that defines the structure of your add-on's user interface. You can create elements like buttons, text fields, and layout containers here. Functionally, this tab mirrors the role of the index.html file you'd use in a typical add-on project.
Example:
Copied to your clipboard<div class="addon-container"><h2>My Add-on</h2><button id="myButton">Click Me</button><input type="text" id="myInput" placeholder="Enter text"></div>
2. CSS Tab
Style your add-on's HTML elements in this tab. Create a visually appealing interface consistent with Adobe Express design patterns. This section corresponds to the styles.css file in a standard add-on project.
Example:
Copied to your clipboard.addon-container {padding: 20px;font-family: 'Adobe Clean', sans-serif;}#myButton {background-color: #0073e6;color: white;border: none;padding: 10px 20px;border-radius: 4px;cursor: pointer;}#myInput {width: 100%;padding: 8px;border: 1px solid #ccc;border-radius: 4px;margin-top: 10px;}
3. Iframe JS Tab
This tab is for writing JavaScript code that runs in the iframe context of your add-on. Here, you can interact with:
- The Add-on UI SDK (
addOnUISdk) - The DOM elements in your HTML
- Event handlers for your UI components
This environment corresponds to the code you would typically write in your index.js or UI JavaScript files in a full add-on project.
Example:
Copied to your clipboard// Wait for the add-on UI SDK to be readyaddOnUISdk.ready.then(() => {console.log('Add-on UI SDK is ready');// Get references to DOM elementsconst button = document.getElementById('myButton');const input = document.getElementById('myInput');// Add event listenersbutton.addEventListener('click', () => {const text = input.value;if (text) {// Send message to Document JS tabaddOnUISdk.app.documentSandbox.dispatch({type: 'ADD_TEXT',payload: { text }});}});});
4. Document JS Tab
This tab is where you write JavaScript code that interacts directly with the Adobe Express document. It runs in the Document Sandbox environment and gives you access to:
- Document manipulation capabilities with the Document APIs
- Communication APIs to facilitate interaction between the iframe context and the Document Sandbox
The Document JS tab corresponds to the code typically found in the code.js file of a complete add-on project.
Example:
Copied to your clipboard// Import necessary modulesimport { editor, text } from 'express-document-sdk';// Listen for messages from the iframeaddOnUISdk.app.documentSandbox.addEventListener('message', (event) => {if (event.data.type === 'ADD_TEXT') {addTextToDocument(event.data.payload.text);}});async function addTextToDocument(textContent) {try {// Create a new text nodeconst textNode = await text.create({text: textContent,fontSize: 24,fontFamily: 'Arial'});// Add it to the documenteditor.context.insertNode(textNode);console.log('Text added to document');} catch (error) {console.error('Error adding text:', error);}}
Key Differences from Script Mode
| Feature | Script Mode | Add-on Mode |
|---|---|---|
Global Await | Yes | No - must use async functions |
Automatic Imports | Yes | No - must import manually |
UI Building | No | Yes - full HTML/CSS/JS |
Environment | Document Sandbox only | Both iframe and Document Sandbox |
API Access | Document APIs only | Document APIs + Add-on UI SDK |
Best Practices
Code Organization
- Keep UI logic in the Iframe JS tab
- Keep document manipulation in the Document JS tab
- Use clear, descriptive variable and function names
- Comment your code for better maintainability
Communication Between Tabs
- Use the communication APIs to send data between iframe and Document Sandbox
- Define clear message types and payload structures
- Handle errors gracefully in both contexts
Performance
- Avoid heavy computations in the iframe context
- Use async/await properly for document operations
- Test your add-on with different document sizes and complexity
Transitioning from Script Mode
If you've already developed functionality in Script Mode:
- Copy your code from Script Mode
- Paste it into the Document JS tab
- Add the necessary
importstatements - Wrap your code in appropriate functions
- Build your UI in the other tabs
- Set up communication between iframe and Document Sandbox
Next Steps
- Workflow & Productivity: Learn keyboard shortcuts and session management
- Troubleshooting: Get help with common issues
- API References: Learn about the Document APIs and Add-on SDK
- How-To Guides: Master specific techniques and best practices


