Create a webhook
A webhook is a user-defined HTTP callback that is triggered by an event in Adobe Commerce. When the event occurs, the webhook sends an HTTP request to a specified URL with a payload containing information about the event. An event that can trigger a webhook is also known as a webhook method.
Before you create a webhook, you must resolve the following questions:
What information does the Commerce event contain?
What data structure does the remote server require for incoming requests?
With this knowledge, you can create a webhook, which defines the following sets of information:
The basic definition of the webhook. This includes the webhook name, the event (webhook method) to listen for, the URL to send the HTTP POST request to, timeout settings, fallback error messages, and more.
Authentication information. In Adobe Commerce as a Cloud Service (SaaS), you can configure OAuth credentials from the Admin. In Platform as a Service (PaaS) and on-premises environments, you define authentication information in auth headers using
envandconfigvariables in the hook headers section or as part as a custom module.The definition of one or more hooks. Specify which fields of a webhook method to include in the payload and transform the payload into a format that is compatible with the external system.
The definition of one or more request headers. You can define the headers to include in the request, such as authorization tokens and other connection parameters.
Optional rules that trigger only when certain conditions are met, such as when a string matches a specific value.
SaaS only In Adobe Commerce as a Cloud Service, you can create a webhook subscription in the Admin or by using a REST endpoint. (See Subscribe a webhook for details on using REST.) Adobe Commerce as a Cloud Service does not support all possible webhook methods. Open a support ticket to request additional webhook methods.
PaaS only In Platform as a Service (PaaS) and on-premises environments, you must create an app/etc/webhooks.xml file or create a custom module that includes a <custom-module-root>/etc/webhooks.xml file.
Define webhook properties
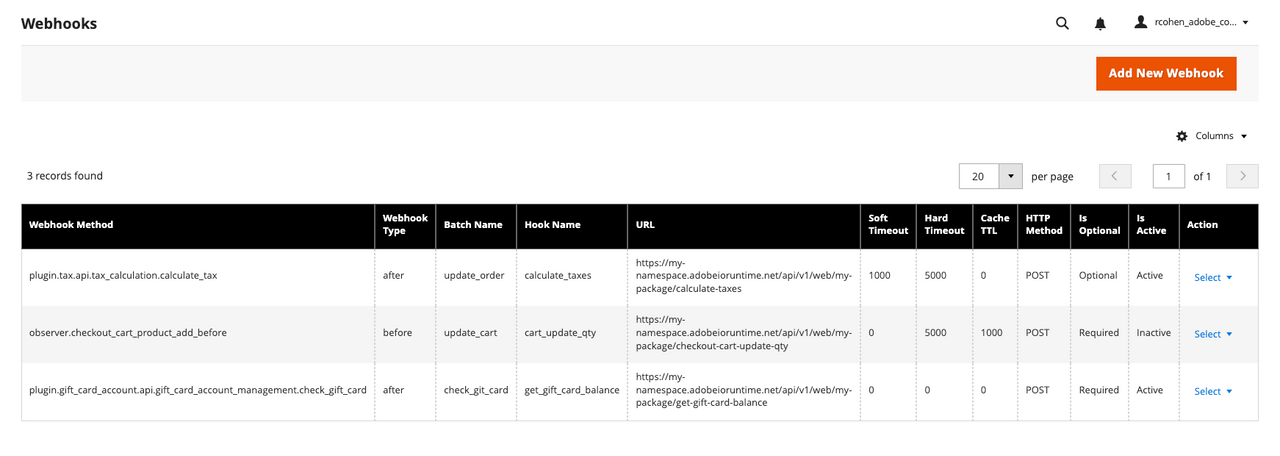
Adobe Commerce as a Cloud Service customers can select System > Webhooks > Webhooks Subscriptions in the Admin to display the Webhooks grid page.

The rows of this grid show configuration settings for all registered hooks, both active and inactive.
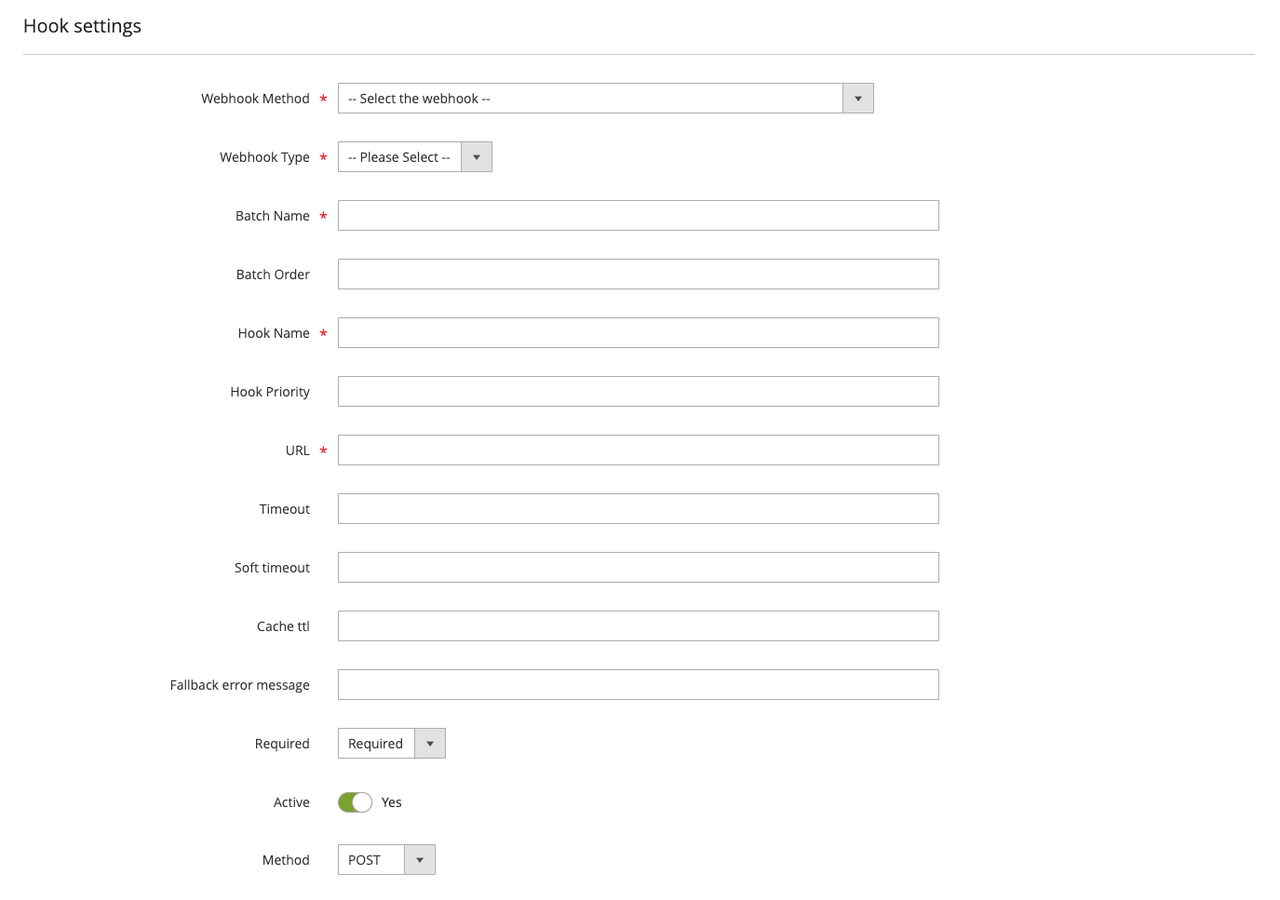
Click Add New Webhook from the grid page to display the form for creating a new hook.

On PaaS systems, you can create a webhooks.xml file in the etc directory of a custom module or in the Commerce app/etc/webhooks.xml file. The XML file has the following structure:
Copied to your clipboard|__ config|__ method|__ hooks|__ batch|__ hook|__ headers| |__ header|__ fields| |__ field|__ rules|__ rule
The following table describes the properties of a webhook subscription. The Admin field column lists the field name in the Admin, and the XML attribute column describes the corresponding XML attribute in the webhooks.xml file.
| Admin field | XML attribute | Description |
|---|---|---|
Webhook Method | method.name | If using the Admin, select one of the supported Commerce webhook names from the dropdown. Otherwise, the value of the webhook method name must be in the form <event_type>.<webhook_name>, where event_type is either observer or plugin, and webhook_name matches a valid Commerce event name. In PaaS environments, use the bin/magento webhooks:list:all command to display a list of possible webhooks. |
Webhook Type | method.type | Specify whether to run the webhook before or after the original action. |
Batch Name | batch.name | A unique name for the batch. Use a descriptive name that encompasses all the hooks in the batch. The name must contain English alphanumeric characters and underscores (_) only. |
Batch Order | batch.order | An integer that sets the order in which multiple webhooks are executed. All hooks within a batch are sent in parallel. Therefore, as you add hooks to a batch, keep in mind what task each hook will perform. For example, since the hooks are executed in parallel, you should not place a hook that relies on a response from another hook in the same batch. A default value of 0 is saved if no value is set. |
Hook Name | hook.name | A name that must be unique within a batch. The name must contain English alphanumeric characters and underscores (_) only. |
Hook Priority | hook.priority | The priority of the merging hook results in the batch. The priority is treated as 0 if a value is not set. |
URL | hook.url | The HTTP endpoint to send the request for processing. The hook URL is formed by concatenating an environment variable and a partial path. This practice is useful for developing in different environments, such as those for staging and production, where the hook URLs are different. For PaaS, the hook URL can optionally be formed using an environment variable and partial path. For SaaS, you specify a full URL without environment variables. |
Timeout | hook.timeout | A hard timeout limit (in milliseconds) for the request. Requests exceeding this timeout are aborted and logged. The default value of 0 indicates there is no timeout limit. |
Soft timeout | hook.softTimeout | A soft timeout limit (in milliseconds) for the request. Requests exceeding this timeout are logged for debugging purposes. |
Cache TTL | hook.ttl | The cache time-to-live (in seconds) for requests with the same URL, body, and headers. If this attribute is not specified, or if the value set to 0, the response is not cached. |
Fallback error message | hook.fallbackErrorMessage | The error message to display if the hook fails. |
Required | hook.required | Specifies whether hook execution is required or optional. When set to Optional ( false), if the hook fails to execute, the failure is logged and subsequent hooks continue to be processed. When set to Required (true), a failure terminates the process. |
Active | hook.remove | Indicates whether to skip a removed hook during the batch execution. In the Admin, if you set this field to No, the hook is skipped. In a webhooks.xml file, if you set the value to true, the hook is skipped. |
Method | hook.method | The HTTP method (POST, PUT, GET, or DELETE) used to invoke the hook. |
Unless you want to send the entire default payload, unedited, you must define at least one hook field. You will usually need to define authentication information. You can also optionally define rules that allow the webhook to run when the event payload contains configured values.
Webhooks configuration reference describes the XML schema in further detail.
Configure developer console OAuth
PaaS onlyIn PaaS environments, you can define OAuth credentials in the developerConsoleOauth element of a webhooks.xml file. See Best practices for webhook development for details.
The Developer Console OAuth configuration panel provides the ability to configure the details of an OAuth credential from the Adobe Developer Console. If configured and enabled, an IMS token will be generated using the credential details and passed in an Authorization header with the hook request.
See Setting up the OAuth Server-to-Server credential for information on creating an OAuth credential in the Adobe Developer Console.
| Field | Description |
|---|---|
Enabled | Indicates whether to use OAuth credential details to generate an Authorization token for hook requests. |
Client ID | The Client ID for the OAuth credential. |
Client Secret | The Client Secret for the OAuth credential. |
Organization ID | The Organization ID for the OAuth credential. |
Configure hook fields
The Hook Fields configuration panel or the fields element in the webhooks.xml file defines the payload of a webhook request and maps the fields of the webhook method to the payload structure required by the remote server.
| Admin field | XML attribute | Description |
|---|---|---|
Name | field.name | The path to the field to include in the transmitted webhook, such as product.sku. |
Source | field.source | The path to the value in the default webhook, such as quoteItem.sku. If not set, the Name value is used. |
Active | field.remove | Indicates whether to include the field in the payload. By default, all fields are included. If you are building a webhooks.xml file, set field.remove to true to remove the field from the payload. |
- | field.converter | A class that transforms the value of a field, such as from integer to string. This attribute is only available in webhooks.xml files. |
Define hooks describes how to define the fields of a webhook request.
Configure hook headers
In PaaS environments, you define authorization tokens and other connection parameters in the headers element of a webhooks.xml file. In SaaS environments, you define similar authentication information in the Developer Console OAuth configuration panel. However, you can still define additional headers in the Hook Headers configuration panel.
The Hook Headers configuration panel defines the headers of a webhook request.
| Admin field | XML attribute | Description |
|---|---|---|
Name | header.name | The header name, in the same form as it will be sent. For example, Authorization. |
Value | - | The value of the header, such as Bearer: <token>. |
Active | header.remove | Set to No (SaaS) or true (PaaS) to remove the header from the request. |
The x-adobe-commerce-request-id is added automatically to each request and is used to track the request in the system. You can filter logs by this ID to find all logs related to a specific request.
Secrets and other sensitive data should not be stored in the webhooks.xml file. Instead, use environment or configuration variables to relay this information.
Dynamic header resolvers
PaaS onlyInstead of storing secrets that expire in environment variables, you can create a dynamic header resolver to manage these values. To create your own resolver, define a new class that implements Magento\AdobeCommerceWebhooks\Model\HeaderResolverInterface, as shown below.
Copied to your clipboard<?phpdeclare(strict_types=1);namespace Magento\WebhookModule\Model;...class AddProductToCartResolver implements HeaderResolverInterface{public function __construct(private TokenGenerator $tokenGenerator,private CustomConfig $customConfig,) {}/*** Returns an array of custom headers** @return array*/public function getHeaders(): array{return ['Authorization' => 'Bearer ' . $this->tokenGenerator->getToken(),'Api-key' => $this->customConfig->getApiKey(),'secret-key' => $this->customConfig->getSecretKey(),];}}
Point to the AddProductToCartResolver class in the header.resolver attribute.
Copied to your clipboard<hook name="validate_stock" url="{env:APP_VALIDATE_STOCK_URL}/product-validate-stock" timeout="2000" softTimeout="200" required="true" fallbackErrorMessage="Can't add the product to the cart right now"><headers><header resolver="Magento\WebhookModule\Model\AddProductToCartResolver" /></headers></hook>
Application context header values
You can create hook headers with values from the application context. See Context fields for details.
Configure hook rules
The Hook Rules configuration panel or rules element allows you to define rules that trigger a webhook when certain conditions are met. Create conditional webhooks describes how to configure hook rules.
| Admin field | XML attribute | Description |
|---|---|---|
Field | rule.field | The event field to be evaluated. For nested fields, use the dot-separated format, such as data.order.product.id. |
Value | rule.value | The value to be compared. |
Operator | rule.operator | Defines which comparison operator to use. Examples include equal, notEqual, and regex. |
Active | rule.remove | Set to No (SaaS) or true (PaaS) to remove the rule from the request. |


