Install Adobe Commerce integration starter kit
Give us 45 minutes, and we will help you integrate Commerce with your back office system following our best practices.
Prerequisites
To get started with Adobe Commerce integration starter kit:
Have an Adobe Developer account with System Administrator or Developer Role permissions. Getting started with Adobe Developer Console describes how to enroll in the Adobe developer program.
Have access to App Builder as described in How to Get Access to App Builder. There could be a delay in processing access requests.
Have access to an Adobe Commerce on cloud infrastructure or to an on-premises instance.
Big picture
Integrating Adobe Commerce with your enterprise resource planning (ERP), order management system (OMS), or customer relationship management (CRM) is now easier with Adobe Commerce integration starter kit. The starter kit reduces the cost of integrating with ERP solutions and improves reliability of real-time connections. It includes reference integrations for commonly used commerce data like orders, products, and customers. It also includes onboarding scripts and a standardized architecture for developers to build while following best practices.
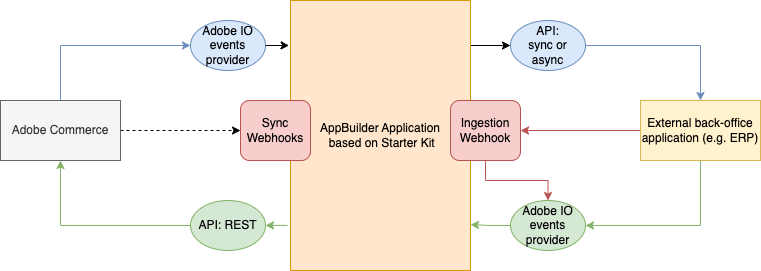
Create your integration (step-by-step)
The best part about the integration starter kit is that it provides a standardized architecture that follows Adobe Commerce best practices. We think that you can get through this single-page tutorial in under an hour.
Support services for the starter kit include the basic functionality and configuration. Because the starter kit is a scaffolding designed to make custom integrations easier, Adobe does not provide support services for modified code or your custom integrations.
Onboarding
Projects Overview describes the different types of projects and how to manage them. Here, we'll create a templated project.
Log in to the Adobe Developer Console and select the desired organization from the dropdown menu in the top-right corner.
Click Create new project from template.

If the Create project from template option is not displayed, it might be because your request to access App Builder has not yet been approved.
Select App Builder. The Set up templated project page displays.
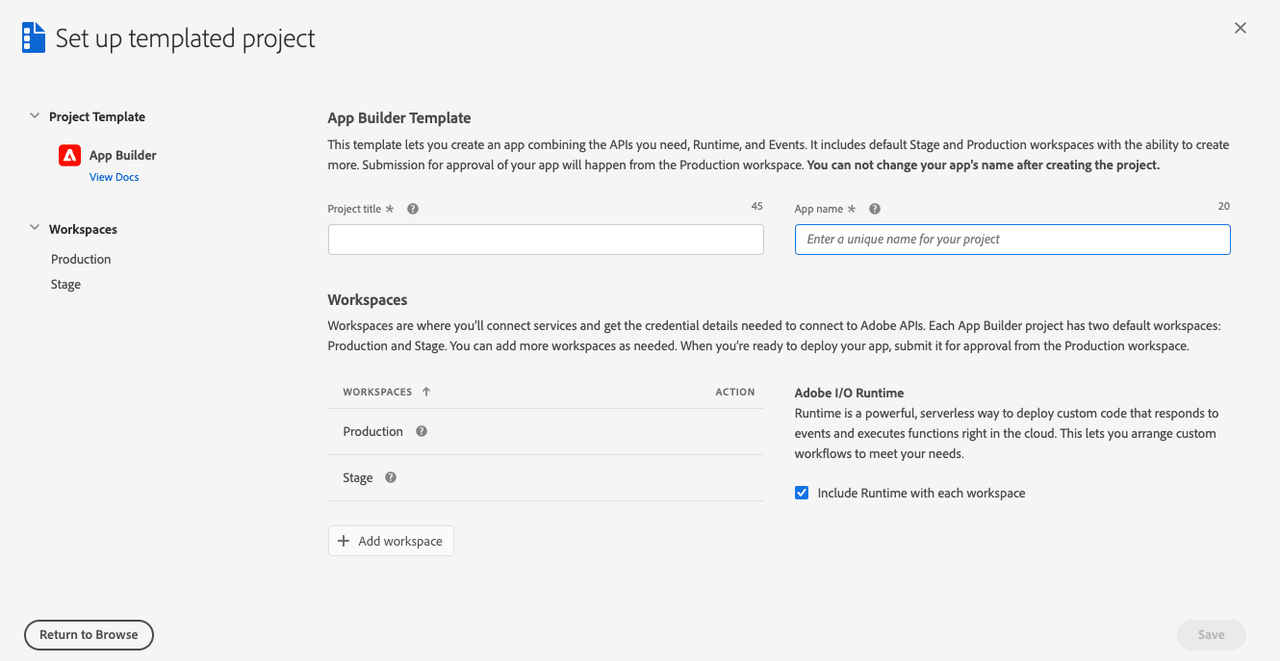
Specify a project title and app name. Make sure the Include Runtime with each workspace checkbox is selected. You can optionally create a custom workspace other than the default Stage workspace. To create a custom workspace, click Add Workspace, and enter a name and description. Click Save. The Console creates a project and workspaces.
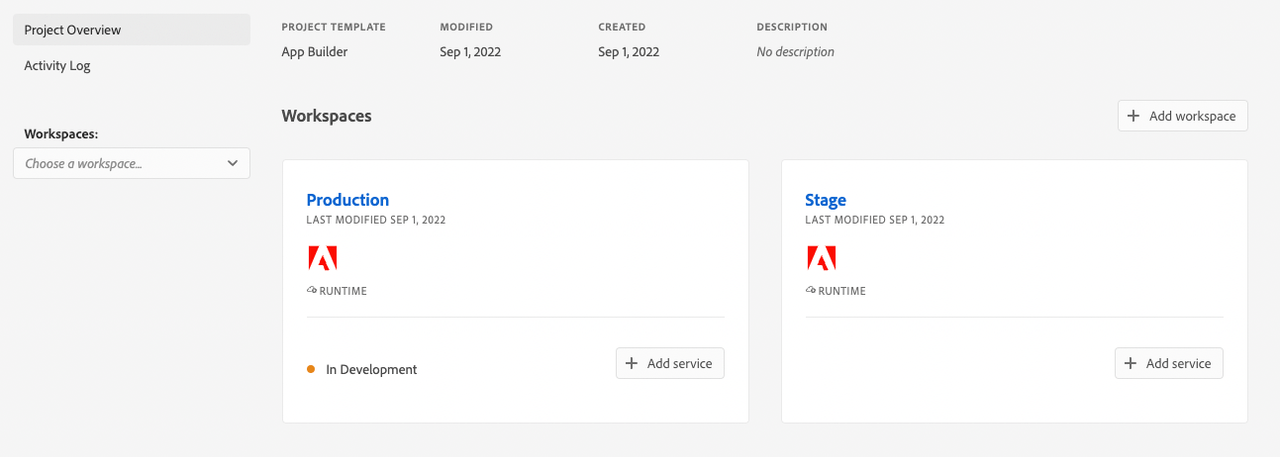
In your workspace, click the Add service pop-up menu and select API.
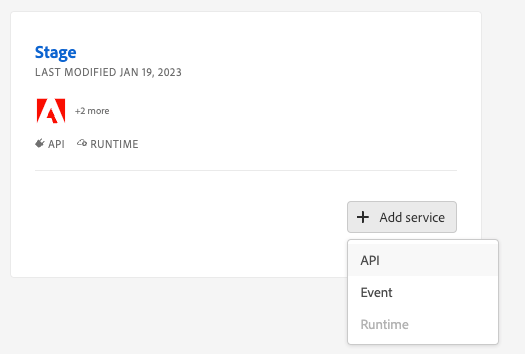
Add the following services to your workspace. Each service must be added individually. You cannot add multiple services simultaneously.
- I/O Management API
- I/O Events
- Adobe I/O Events for Adobe Commerce
Click one of these services, such as I/O Management API. Then click Next.

On the Configure API page, select the OAuth Server-to-Server option and click Save configured API.
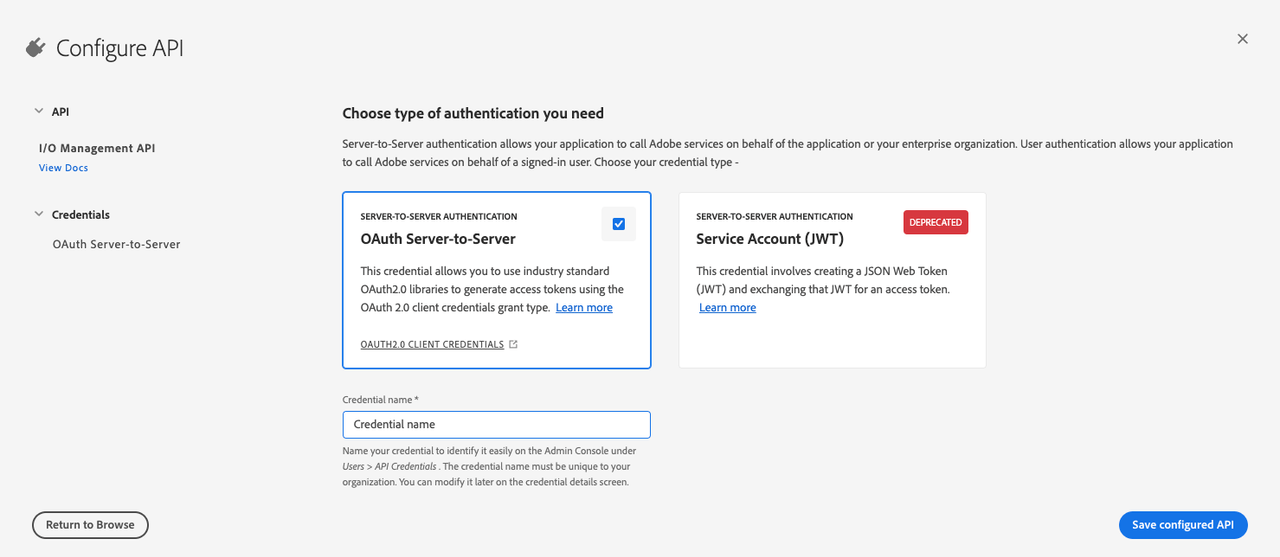
Note: You can set up server-to-server authentication using JSON Web Tokens (JWT). However, this method has been deprecated in favor of OAuth and must be replaced no later than January 1, 2025. See Service Account (JWT) Authentication for details on implementing this solution.
Use the Add service pop-up menu to select and add the other required services.
If you are using JWT authentication, unzip the downloaded
config.zipfile. The extractedconfigdirectory should contain acertificate_pub.crtand aprivate.keyfile. Theprivate.keyfile is required to configure the Commerce Admin.
Download the workspace configuration file
The console can generate a JSON file that defines the configuration of your workspace. You will use this file to configure the Commerce Admin and to set up the starter kit.
To download a .json file containing your workspace configuration:
Go to the overview page of your workspace.
Click the Download All button in the top-right corner.
The
<Workspace-name>.jsonfile downloads automatically. In this example, the file is named977AmethystGazelle-1340225-Stage.json. Rename the fileworkspace.jsonand save it in thescripts/onboarding/config/directory of the starter kit.
Create an integration in Adobe Commerce
A Commerce integration generates the consumer key, consumer secret, access token, and access token secret that are required to connect to the starter kit. It also identifies the available API resources that are needed for the integration.
Use the following steps to create and activate an integration.
From the Admin, go to System > Extensions > Integrations.
Click Add New Integration. The New Integration page displays.
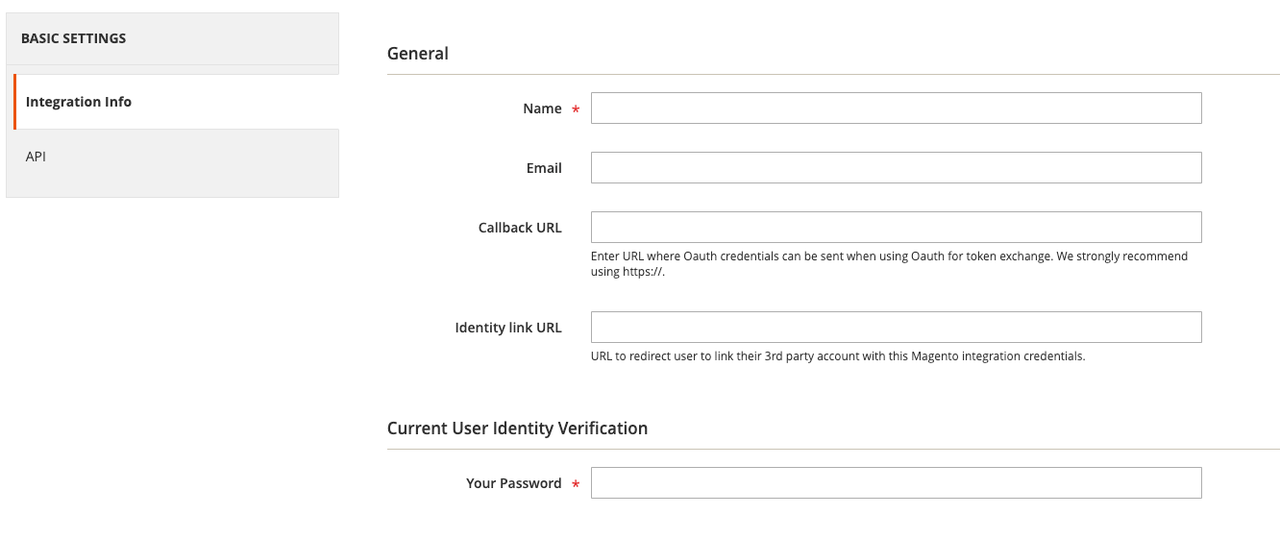
Enter a name for the integration in the Name field. Leave the other fields blank.
Click API under the Basic Settings menu to display the Available APIs screen. Change the value of the Resource Access drop-down menu to All.
Click Integration Info and enter your Admin password in the Your Password field. Click Save to return to the Integration page.
Click the Activate link in the grid.

On the next page, click the Allow button to display the Integration Tokens for Extensions page.

You will need the integration details (consumer key, consumer secret, access token, and access token secret) to configure the starter kit. Copy these values to a safe place and click Done.
Install Adobe I/O Events for Adobe Commerce (Commerce 2.4.4 and 2.4.5 only)
If you are running Adobe Commerce 2.4.6 or higher, the modules that enable eventing are installed automatically. Skip to the next step. If you are running Commerce 2.4.4 or 2.4.5, you must install modules to enable eventing, as described in Install Adobe I/O Events for Adobe Commerce.
Using Adobe I/O Events for Commerce 1.6.0 or later will automate some steps of the onboarding process detailed in the following section.
Download and configure the starter kit
Use the following steps to download and configure the Adobe Commerce integration starter kit. The starter kit is located in a public repository.
Clone the repo using SSH:
Copied to your clipboardgit clone git@github.com:adobe/commerce-integration-starter-kit.gitChange directories to the downloaded repo and copy the
env.distfile.Copied to your clipboardcd <download-directory> && cp env.dist .envFill in the values in the
.envfile. The file describes where you can find the values for each environment variable.
Configure the starter kit
Install npm dependencies:
Copied to your clipboardnpm installRun the following Adobe I/O commands to connect your starter kit project to the App Builder project you created earlier:
Copied to your clipboardaio loginaio console org selectaio console project selectaio console workspace selectSync your local application with the App Builder project using the following command:
Copied to your clipboardaio app use --mergeThe
app.config.yamlfile in the repo's root directory defines which packages to deploy. The Integration Starter Kit provides packages for Commerce products, customers, orders, shipments, and stocks and their external back office counterparts. Comment out any unneeded packages that are not applicable to your project.Note: The
infoaction is enabled by default. This action is reserved for future use. Do not disable or delete theinfoaction.
Deploy the project
Run the following command to deploy the project. The command deploys the runtime actions needed for the onboarding step:
Copied to your clipboardaio app deploy
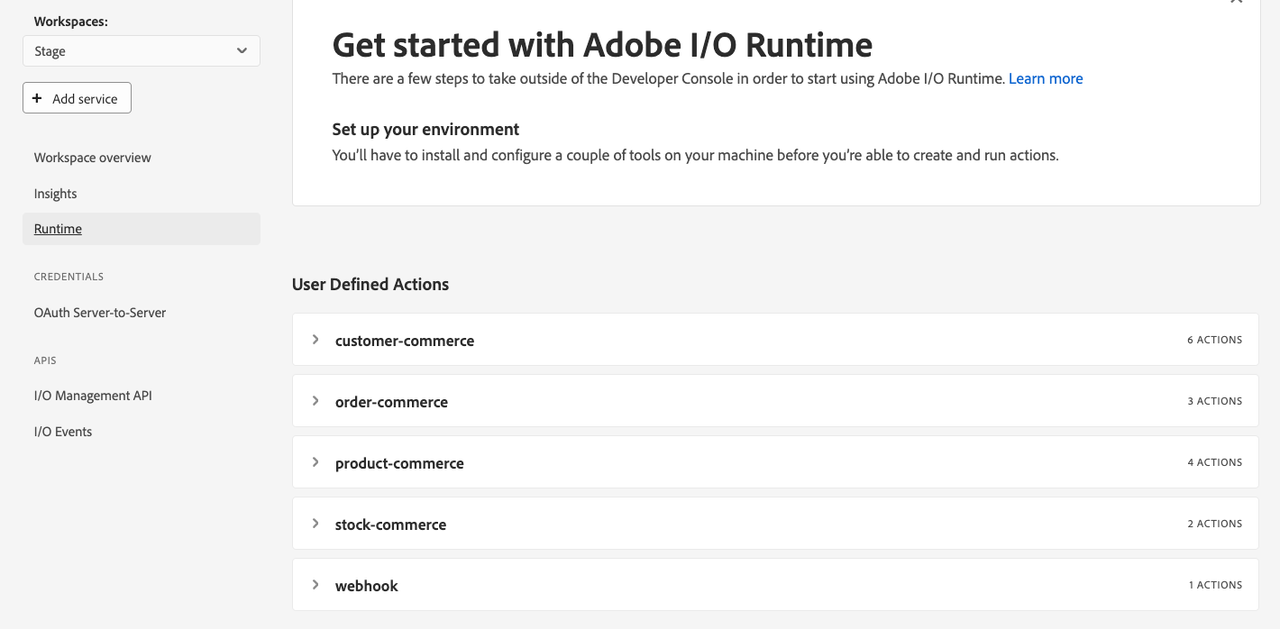
You can confirm the success of the deployment in the Adobe Developer Console by navigating to the Runtime section on your workspace.
Complete the configuration
The next steps in the onboarding process configures event registrations and completes the eventing configuration in Adobe Commerce.
Configure the event registrations
By default, the scripts/onboarding/config/starter-kit-registrations.json config file creates all the registrations for all entities that are present in the repo's app.config.yaml file. You can edit this file to remove any unnecessary Commerce or back office registrations. For example, the YAML file shown in the Configure the project section comments out the product-backoffice package. In this case, you must remove backoffice from the product entity:
Copied to your clipboard{"product": ["commerce"],"customer": ["commerce", "backoffice"],"order": ["commerce", "backoffice"],"stock": ["commerce", "backoffice"]}
The Customize Registrations and Events code sample shows how you can configure your event registrations.
Execute the onboarding
Run the following command to generate the IO Event providers and the registrations for your starter kit project.
IO Event providers and registrations will be configured automatically if you are using Adobe I/O Events version is 1.6.0 or later.
Copied to your clipboardnpm run onboard
The console displays the provider's IDs. The commerce instance and provider IDs will be used to configure your Commerce instance. You will need the backoffice provider ID to send the events to the App builder project.
Copied to your clipboardProcess of On-Boarding done successfully: [{key: 'commerce',id: '<Commerce Provider ID>',instanceId: '<Instance ID of Commerce Provider',label: 'Commerce Provider'},{key: 'backoffice',id: '<Backoffice Provider ID>',instanceId: '<Instance ID of backoffice provider',label: 'Backoffice Provider'}]
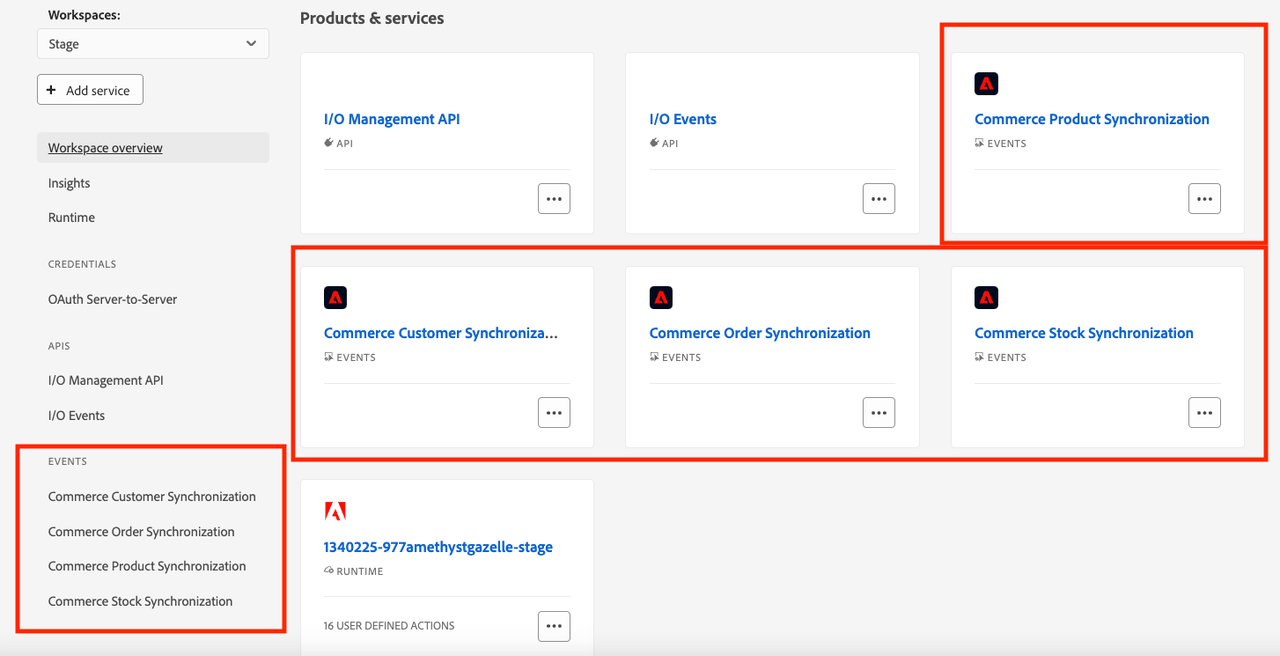
Check your App in the Developer Console to confirm the registrations were created.
Complete the Adobe Commerce eventing configuration
The following steps are not required when using Adobe I/O Events version 1.6.0 or later. The onboarding script will configure the Adobe Commerce instance automatically.
Proceed to the next section, or continue following the steps in this section to validate that the configuration is correct.
You must configure Commerce to communicate with your project. Configuration includes copying and pasting the contents of the workspace configuration file that you downloaded from the Adobe Developer Console.
In the Commerce Admin, navigate to Stores > Settings > Configuration > Adobe Services > Adobe I/O Events > General configuration. The following screen displays.
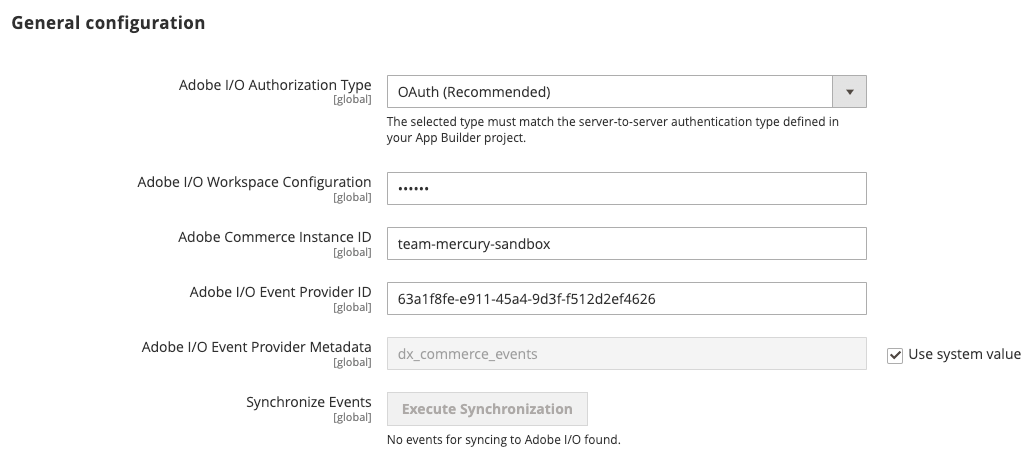
Select the server-to-server authorization method you implemented from the Adobe I/O Authorization Type menu. Adobe recommends using OAuth. JWT has been deprecated.
Copy the contents of the
<workspace-name>.jsonfile into the Adobe I/O Workspace Configuration field.Enter a unique identifier in the Adobe Commerce Instance ID field. This unique value identifies your Commerce instance, which allows Commerce events to connect to the correct
Event Providerin Adobe I/O. This ID corresponds to the Provider displayed when subscribing to events.Note: This value must contain English alphanumeric characters, underscores (_), and hyphens (-) only.
Click Save Config, but do not leave the page. The next section creates an event provider, which is necessary to complete the configuration.
Enable Commerce Eventing by setting Enabled to
Yes.
Note: You must enable cron to allow Commerce to send events to the endpoint.
Enter the merchant's company name in the Merchant ID and the environment name in the Environment ID field. The values of these fields will be combined and added as a
sourceattribute to your event data to identify the source of the events. It can be useful for event filtration or other logic if you are using the same event provider for several environments or projects.Note: The Merchant ID and Environment ID fields only support alphanumeric characters and underscores.
Copied to your clipboard"source": "<merchant-id>.<environment-id>"(Optional) By default, if an error occurs when Adobe Commerce attempts to send an event to Adobe I/O, Commerce retries a maximum of seven times. To change this value, uncheck the Use system value checkbox and set a new value in the Maximum retries to send events field.
(Optional) By default, Adobe Commerce runs a cron job (clean_event_data) every 24 hours that deletes event data three days old. To change the number of days to retain event data, uncheck the Use system value checkbox and set a new value in the Event retention time (in days) field.
Click Save Config.
Subscribe to events in Adobe Commerce
To automatically subscribe to Commerce events using Adobe I/O Events version 1.6.0 or later, run the commerce-event-subscribe script in the scripts/commerce-event-subscribe/config/ directory.
Copied to your clipboardnpm run commerce-event-subscribe
For earlier versions, follow the steps below to subscribe to the events manually.
Use the bin/magento events:subscribe command to subscribe to events, as described in Subscribe and register events. The following table defines the events for each supported entity that you must subscribe to and lists the required fields, if applicable.
| Entity | Event | Required fields |
|---|---|---|
Product | observer.catalog_product_delete_commit_after | sku |
Product | observer.catalog_product_save_commit_after | sku, created_at, updated_at |
Customer | observer.customer_save_commit_after | created_at, updated_at |
Customer | observer.customer_delete_commit_after | entity_id |
Customer group | observer.customer_group_save_commit_after | customer_group_code |
Customer group | observer.customer_group_delete_commit_after | customer_group_code |
Order | observer.sales_order_save_commit_after | created_at, updated_at |
Stock | observer.cataloginventory_stock_item_save_commit_after | product_id |


