Create your First App Builder Application
This is a guide through the steps to set up and develop an App Builder Application. Please refer to the Common issues section at the end of this page to resolve any problems you encounter.
1. Check your environment and tools
Make sure you have access to App Builder, and that your local environment and tooling are up to date, as described in Set up Access, Environment, and Tools.
2. Create a new project on Developer Console
Adobe Developer Console gives you access to APIs, SDKs and Developer tools to integrate and extend Adobe products. In App Builder, you will need access to Adobe I/O Runtime credentials to deploy your application, and access to API credentials if you want to access Adobe APIs in your application.
Follow these instructions to set up your project:
Navigate to Adobe Developer Console.
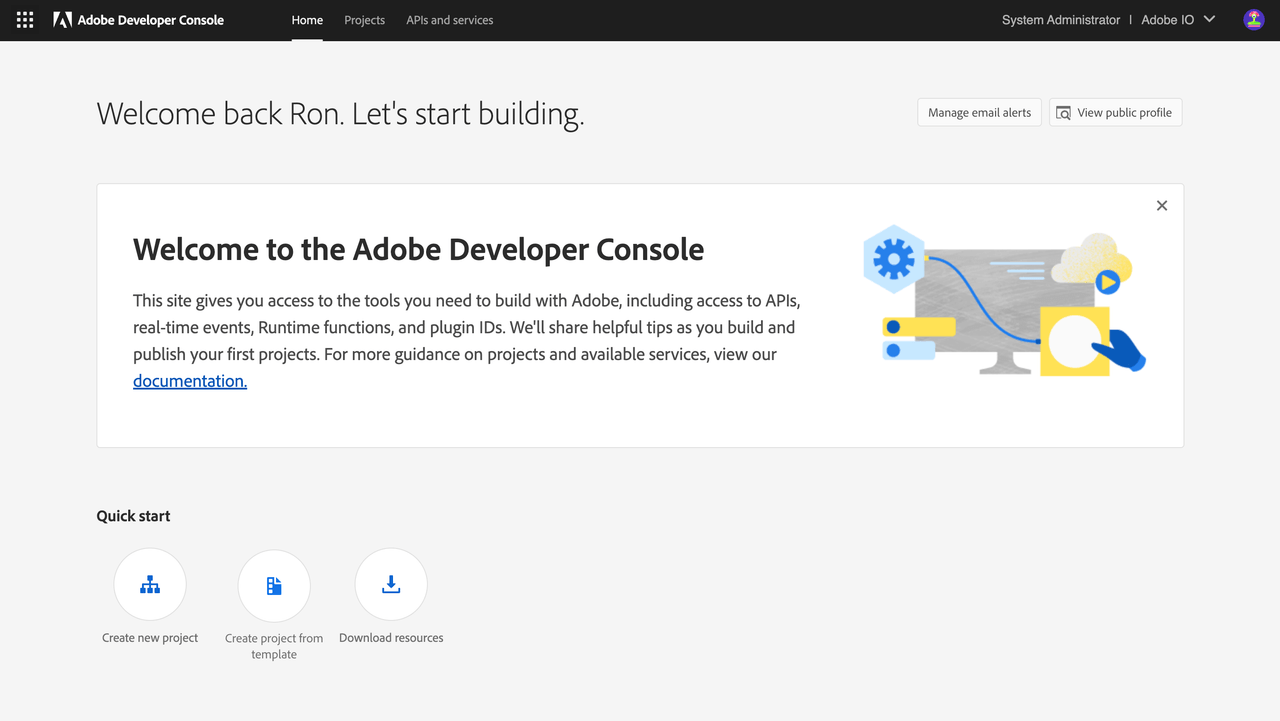
Use the IMS Org Switcher in the upper right corner to select the IMS organization you want to use if it is not the current one.
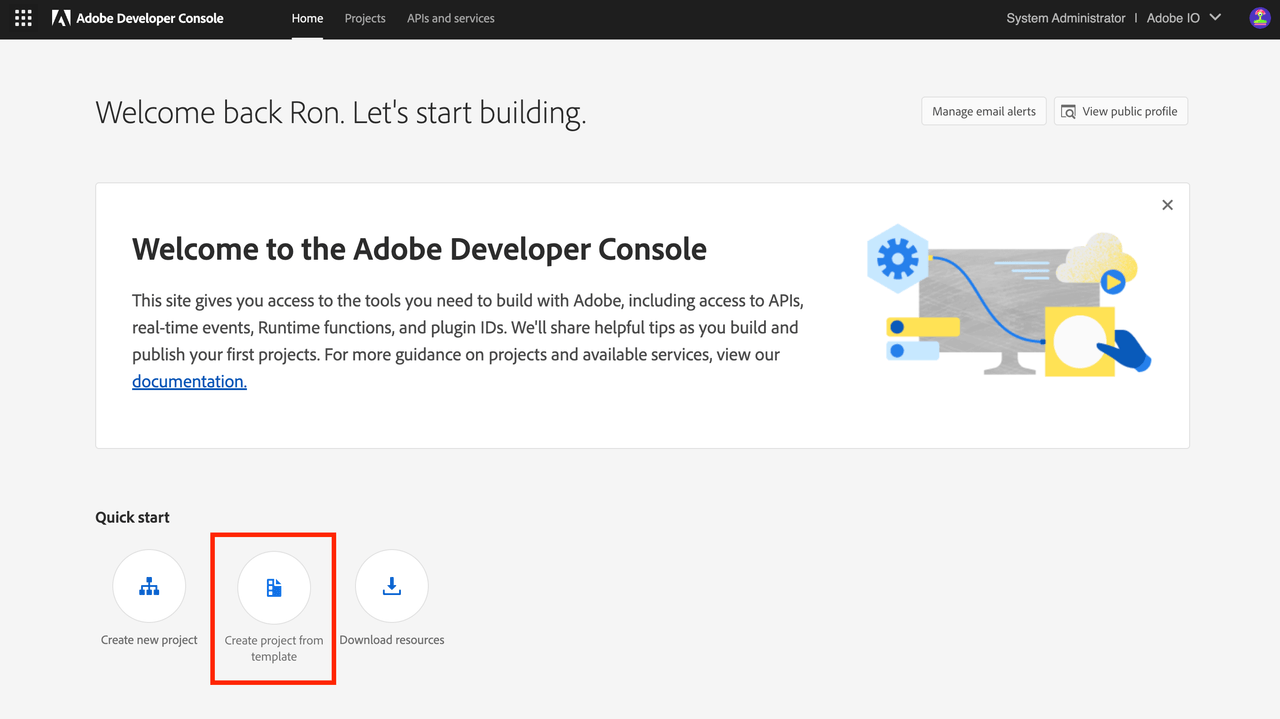
Once you are in the correct organization, click on
Quick Startand select the optionCreate project from templateNote: if you don't see the
Create project from templateoption, confirm that the IMS org is correct. If it is, you do not yet have access to App Builder: recheck the process in Set up Access, Environment, and Tools.Select
App Builderfrom the list of templates.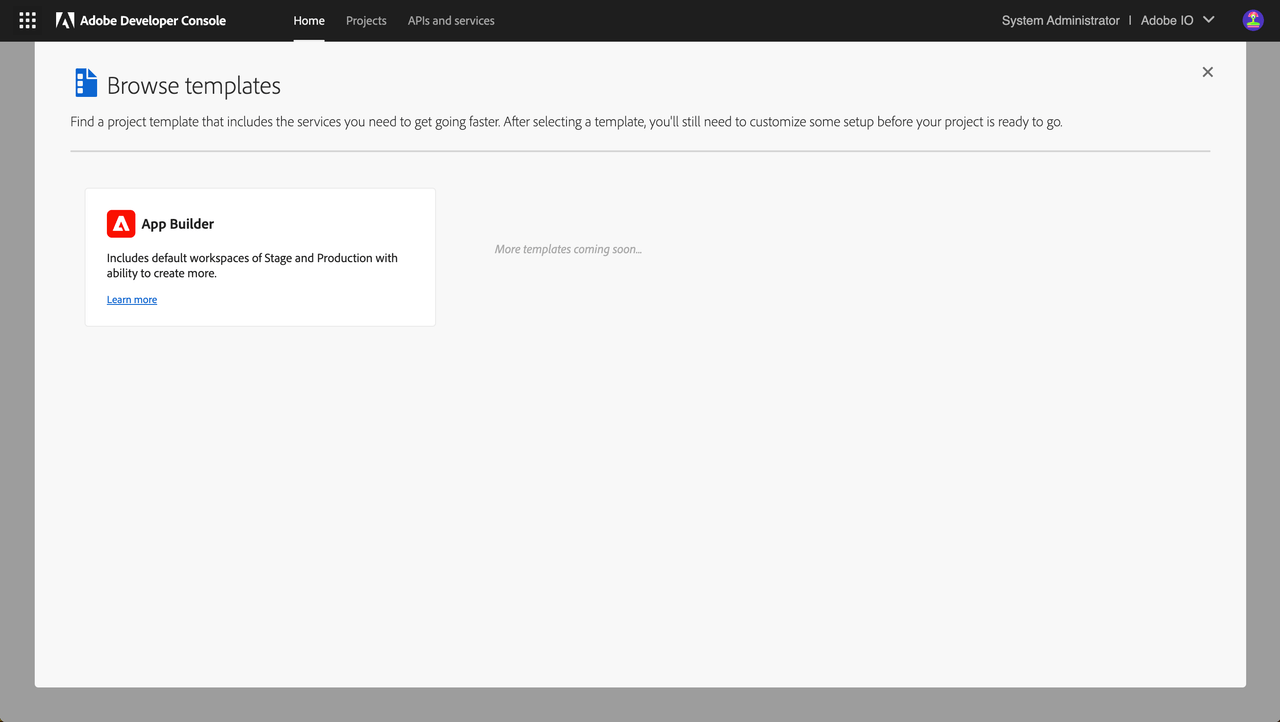
Enter
Project TitleandApp Namefor your templated project.Project Titleidentifies the project in Adobe Developer Console and the CLI. We recommend changing the default title to a meaningful project title.App Nameis the unique identifier for your application.Note: once project setup is complete,
App Namecannot be changed.The "Include Runtime with each workspace" checkbox is checked by default, so each workspace will be provisioned with a unique Adobe I/O Runtime namespace automatically. This allows Developers to work within their own unique Adobe I/O Runtimeenvironments.
Note: If you deselect the checkbox to decline automatic inclusion of Adobe I/O Runtime, you will need to enable it manually for each individual workspace. You cannot auto-add Adobe I/O Runtime to all workspaces once the initial setup is complete.
You can manually remove Adobe I/O Runtime from individual workspaces later if it is not needed.
Click
Savewhen ready.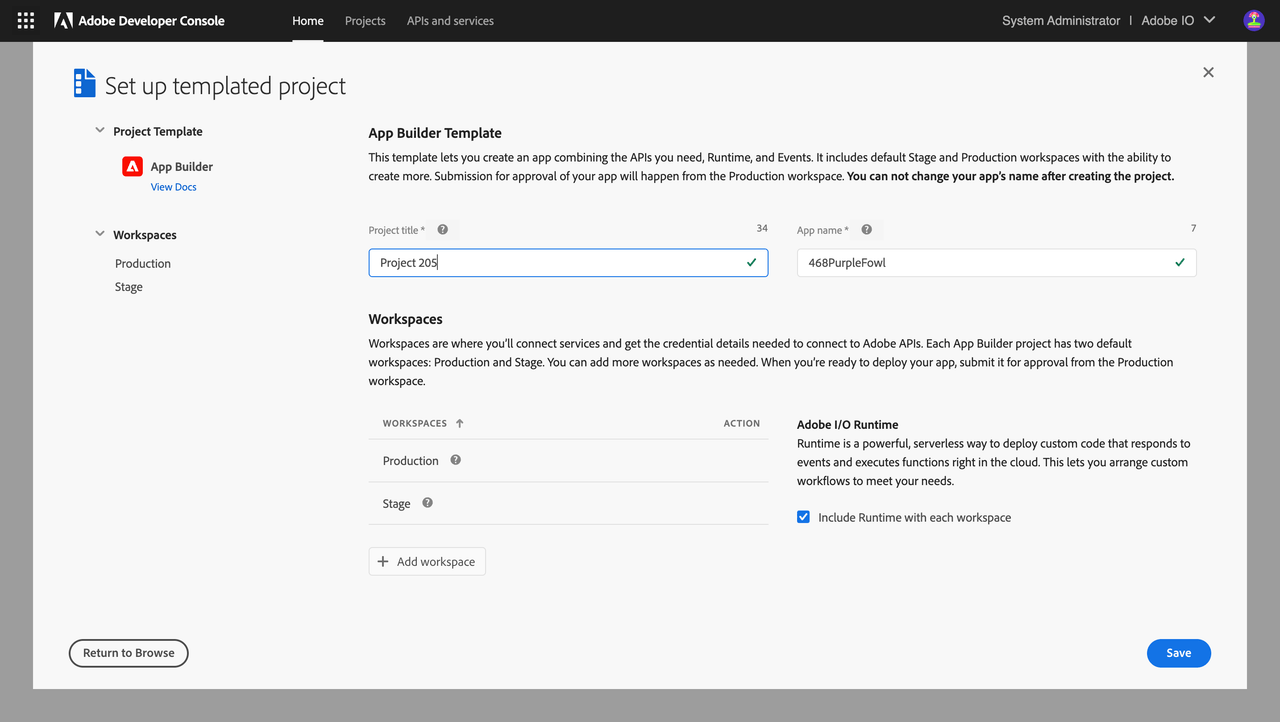
You should now see a new project generated with two default
Workspaces.Workspaces can be used to manage different deployment environments (Development, Q/A, Staging, Production) for your application and to provide individual working environments for each Developer on the project. The workspace is where you will connect services and get credential details needed to connect to Adobe APIs. Connected services may differ from workspace to workspace, and credentials used within each workspace are not shared across workspaces.
Every App Builder project has two default workspaces,
ProductionandStage. You can add more workspaces as needed. TheProductionworkspace is used for submission and distribution workflows: when you’re ready to deploy your app, you will submit it for approval from the Production workspace.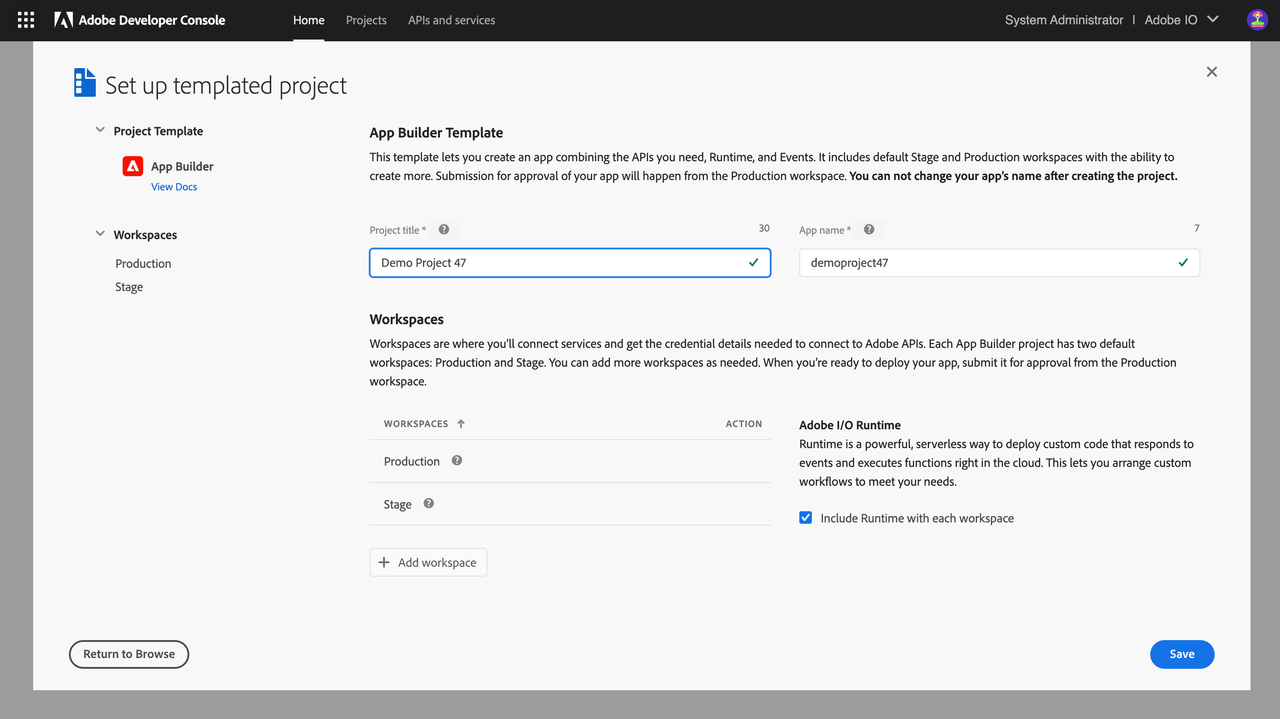
Create a new workspace or select a workspace to add APIs and Events that you will need for your application.
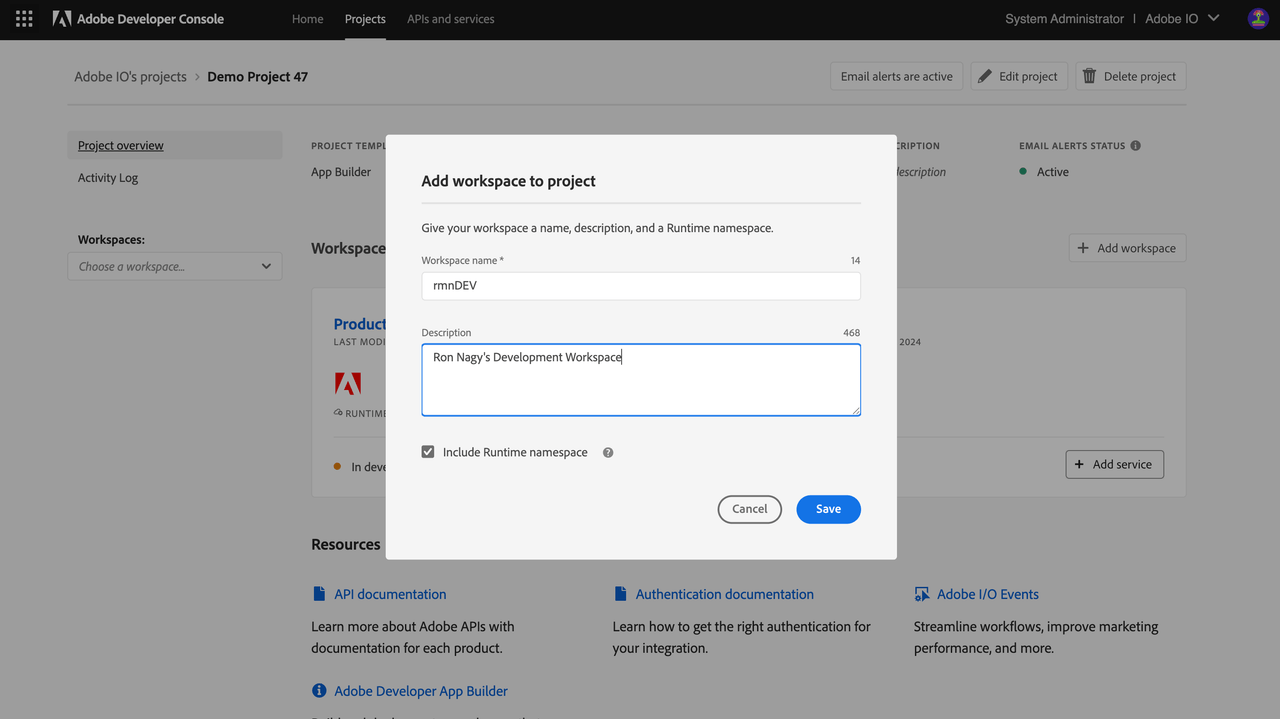
To learn more about Adobe Developer Console, please refer to Console Documentation.
3. Sign in from the CLI
Once your project is set up in Adobe Developer Console, you can move on to your local environment. You can always go back to Adobe Developer Console to modify your project later.
Navigate to the Terminal and enter:
Copied to your clipboardaio loginA browser window should open, asking you to sign in with your Adobe ID. If the window does not automatically, copy/paste the URL shown in your browser to log in:
Copied to your clipboard$ aio loginVisit this url to log in:https://aio-login.adobeioruntime.net/api/v1/web/default/applogin?xxxxxxxxOnce you've logged in, you can close the browser window and go back to Terminal. You will see your user token string displayed in the terminal. Tokens are automatically stored in the CLI configuration, so the CLI can use them to talk to Adobe Developer Console.
Copied to your clipboardeyJ4NXUiOixxxxxxxxxxxxxxxxxxxNow you can use the CLI to start building App Builder Applications.
4. Bootstrap the new app using the CLI
Several flow options are listed below, because some Developers may not have access to Adobe Developer Console as entitled enterprise organization users but may still want to look at the project, and others may wish to import their credentials later.
Entitled enterprise organization users should start immediately below. Developers who plan to use a Console configuration file should start here, and Developers without any credentials should start here.
4.1 Option 1: Developer is logged in as enterprise organization user
Enterprise organization users may learn to initialize App Builder projects using extension points immediately below, or skip here to learn how to initialize empty projects.
4.1.1 Initialize your project with Extension Points
In Terminal, navigate to where you want to initialize your project and type:
Copied to your clipboardaio app init <app_name>You will be prompted with a few questions about how you want your app to be boostrapped and configured.
Select the
Organizationyou plan to use for the new App Builder Application. Navigate through the list to find the project and workspace you just created. If the list of organizations is long, start typing the project name to shorten it.Copied to your clipboard$ aio app init helloworldRetrieving information from Adobe Developer Console..? Select Org Adobe IO DEVOnce you have selected the org, project and workspace, select the product you would like to extend:
Copied to your clipboard? Which extension point(s) do you with to implement?select components to include (Press <space> to select, <a> to toggle all, <i> to invert selection)❯◉ DX Experience Cloud SPA v1◉ DX Asset Compute Worker v1Select the
Projectyou plan to use for the new App Builder application. Navigate through the list to find the project you just created. If it is long, you can start typing to shorten it.Copied to your clipboard? Select Project Demo Project SAXUWhen this selection is complete, the build process should initialize, with installation of npm dependencies.
Copied to your clipboardcreate package.jsoncreate app.config.yamlcreate .aiocreate README.md.......found 0 vulnerabilities✔ App initialization finished!Your project is initialized. Open the folder you just created to see the files that were generated:
Copied to your clipboard$ cd helloworld$ lsREADME.md src app.config.yaml package-lock.json teste2e node_modules package.json web-srcNote that you can add or remove extension points, back-end actions, SPA front-end, and Github workflows from your application later using the
aio app <add|delete> ext,aio app <add|delete> action,aio app <add|delete> web-assetsandaio app <add|delete> cicommands, respectively, in your application folder.You can also install an App Builder template from the template registry: discover available templates in the App Builder template registry with the command:
Copied to your clipboardaio templates discoverInstall desired templates with this command:
Copied to your clipboardaio templates install <npm package name>or this one:
Copied to your clipboardaio templates discover --interactiveThe template's npm package will be downloaded and extracted, and Developer Console resources such as services and workspaces will be created and configured based on the template's install.yaml configuration file.
npm installwill run in the background to install the npm package.This ends the section on how enterprise organization users can initialize App Builder projects using extension points. Please continue reading to explore alternative initialization protocols, or skip ahead to Anatomy of an App Builder Application.
4.1.2 Initialize an empty project
- In your Terminal, navigate to the place you want to initialize your project and type:
Copied to your clipboardaio app init <app_name> --standalone-app
You will be prompted with a few questions about your boostrapping and configuration preferences for the app:
- Select the
Organization,ProjectandWorkspacethat you plan to use for the new application. Navigate through the list to find the project and workspace you just created. You can start typing to shorten long lists. When your selection is complete, the CLI will automatically download aconsole.jsonfile containing all the credentials from your workspace to be used in your App Builder project.
Copied to your clipboard$ aio app init helloworldRetrieving information from Adobe Developer Console..? Select Org Adobe IO DEV? Select Project Demo Project SAXU? Select Workspace saxudevenvcreate console.json
Next, you will be asked to select the app features you want to enable:
Copied to your clipboardYou are about to initialize the project 'demoproject'Generating code in: /Users/sarahxxu/Dropbox/Development/helloworld? Which Adobe I/O App features do you want to enable for this project?select components to include (Press <space> to select, <a> to toggle all, <i> to invert selection)❯◉ Actions: Deploy Runtime actions◉ Events: Publish to Adobe I/O Events◉ Web Assets: Deploy hosted static assets◉ CI/CD: Include GitHub Actions based workflows for Build, Test and Deploy
Each option represents a feature you can enable for the App Builder application. Select one or more depending on the application you intend to build. For this tutorial, we recommend you select them all.
- Actions: Deploy Runtime actions adds the boilerplate for backend serverless actions on Adobe I/O Runtime
- Events: Publish to Adobe I/O Events adds the boilerplate for a serverless action that publishes Custom I/O Events
- Web Assets: Deploy hosted static assets adds the boilerplate for front-end React-Spectrum Single-Page Applications (SPAs) and static assets
- CI/CD: Include GitHub Actions based workflows for Build, Test and Deploy adds the boilerplate for Github Actions that support the Continuous Integration/Continuous Delivery (CI/CD) process for the application
If you included Actions in your last selection, you will be asked to select one or more sample actions to be generated along with the new app:
Copied to your clipboard? Which type of sample actions do you want to create?select type of actions to generate (Press <space> to select, <a> to toggle all, <i> to invert selection)❯◯ Adobe Analytics◯ Adobe Experience Platform: Realtime Customer Profile◉ Generic
These sample actions will help you get started quickly and illustrate best practices for integrating with Adobe APIs using SDK in your applications. You may not see all the options listed below on your command line, because they are recommendations based on the credentials you added in the selected workspace. As with the preceding step, you can select any number of them:
- Adobe Target, including dependencies and examples of accessing the Adobe Target API
- Adobe Analytics, including dependencies and examples of accessing the Adobe Analytics 2.0 API
- Adobe Audience Manager: Customer Data, including dependencies and examples of accessing the Adobe Audience Manager Customer Data API
- Adobe Campaign Standard, including dependencies and examples of accessing the Adobe Campaign Standard (ACS) API
- Adobe Experience Platform: Realtime Customer Profile, including dependencies and examples of accessing the Realtime Customer Profile API of Adobe Experience Platform
- Generic, a generic back-end action with hello-world flow that can be reused and modified, for simple serverless computing, third-party API integration, and more
If you included Web Assets under Adobe I/O App features above, you will be given the choice to include the React Spectrum-based UI template or a raw HTML/JS UI template:
Copied to your clipboard? Which type of UI do you want to add to your project? select template to generate (Use arrow keys)❯ React Spectrum 3 UIRaw HTML/JS UI
The
React Spectrum 3 UItemplate adds a React-based UI with React Spectrum components includedThe
Raw HTML/JS UIwill add a raw HTML/JS/CSS UI with Spectrum CSS styles included.Both templates come with boilerplate code needed to integrate your App Builder application with Adobe Experience Cloud
You will be asked to name the instances of selected sample actions, or keep the default names:
Copied to your clipboard? We are about to create a new sample action that interacts with the Adobe Analytics APIhow would you like to name this action? analytics? We are about to create a new sample action that interacts with the Adobe Experience Platform: Realtime Customer Profilehow would you like to name this action? customer-profile? We are about to create a new sample action that showcases how to access an external APIhow would you like to name this action? (generic)
When this selection is complete, you should see the build process kicking off with necessary npm dependencies are getting installed.
Copied to your clipboardcreate package.jsoncreate app.config.yamlcreate .aiocreate README.md.......found 0 vulnerabilities✔ App initialization finished!
Your project is initialized. Open the folder you just created to see the files that were generated:
Copied to your clipboard$ cd helloworld$ lsREADME.md console.json app.config.yaml package-lock.json testactions e2e node_modules package.json web-src
Note that you can add or remove back-end actions and SPA front-end or Github workflows from your application later using the aio app <add|delete> action, aio app <add|delete> web-assets and aio app <add|delete> ci commands, respectively, in your application folder.
This ends the section on how enterprise organization users can initialize an empty project. Please continue reading to explore initialization protocols for users who are not members of an enterprise organization, or skip ahead to Anatomy of an App Builder Application.
4.2 Developer is not Logged in as enterprise organization user
4.2.1 Developer with a Console config file
This flow is intended for Developers who:
Do not have access to Adobe Developer Console as entitled enterprise organization users, probably due to permission issues, but
Can get credentials that are tied to an App Builder workspace from an entitled enterprise organization administrator or Developer
For this flow to work, the Developer should ask someone with access to set up a project and a workspace following the instructions in the preceding sections. With the workspace correctly set up, credentials can downloaded by authorized Adobe Developer Console users through the Download all button in Workspace overview.
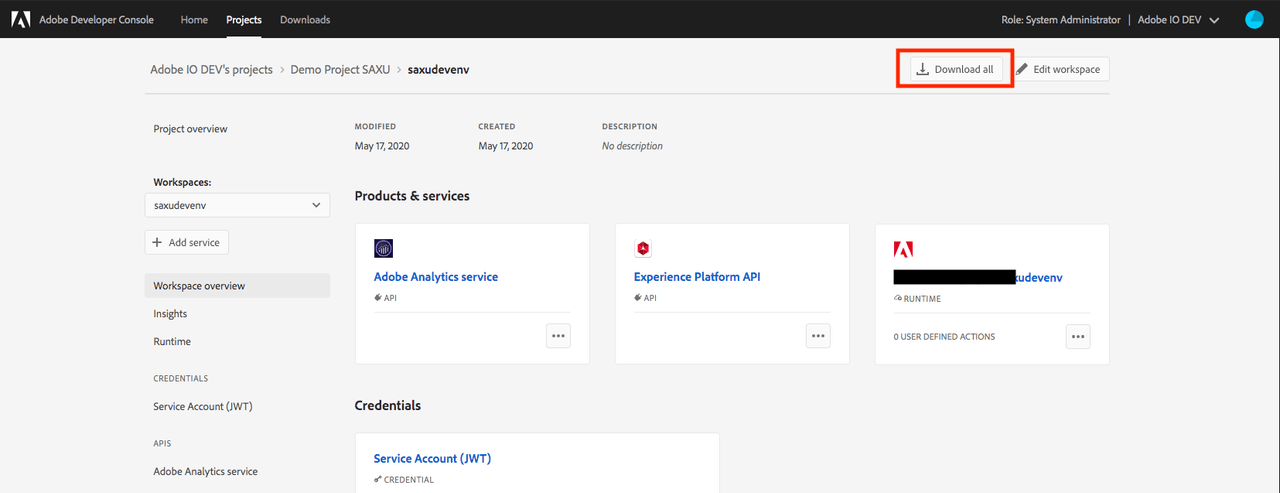
In Terminal, navigate to the place where you want to initialize your project and type:
Copied to your clipboardaio app init <app_name> --import <path_to_config_file>Select project configuration options as in the preceding section
When your project is initialized, open the folder you just created to seethe files generated:
Copied to your clipboard$ cd helloworld$ lsREADME.md e2e node_modules package.json web-srcactions app.config.yaml package-lock.json testWhen you generate a project using a downloaded configuration file without logging into Adobe Developer Console on your CLI, everything should be the same. Adobe uses the values from the downloaded file to pre-populate values in your
.envand.aio. The only difference you will notice is the missingconfig.jsonfile, because that's the file you used to generate this project.This ends the tutorial for Developers initializing their apps from a Console config file. you may review the next section on Developers without access or credentials, or scroll down to "Anatomy of an App Builder Application" below.
4.2.2 Developer without any credentials
This flow is intended for Developers who have no access or credentials but still want to look at the code.
In your Terminal, navigate to the place where you want to initialize your project and type:
Copied to your clipboardaio app init <app_name> -yThe
-yflag allows user to skip all questions and generates a sample project with only thegenericsample action.You should see similar files generated, but none of the config files will be pre-populated.
Copied to your clipboard$ cd helloworld$ lsREADME.md e2e node_modules package.json web-srcactions app.config.yaml package-lock.json testYou will not be able to run or deploy your application by default because no credential was provided.
5. Anatomy of an App Builder Application
Now that your project is initialized, you can open it in your favorite integrated development environment (IDE); we recommend VSCode. If you have enabled the Shell command, open the project by entering code <app-name>; otherwise open VSCode -> Open... -> select app folder.
You should see these folders and files in your project:
src: Instead of one folder for allactionsand allweb-src, you will see individual folders undersrcfor each extension point you selected, for instance, adx-excshell-1folder containing Experience Cloud SPA actions and front-end resources.- In each folder, you should be able to see both the actions and the front-end code. You should also see
ext.config.yaml, a file that contains all the action and extension configuration for the extension point at which it's located. Individual configuration allows for more flexibility in defining and managing individual extension points. Note that this file is also imported toapp.config.yaml, the master config file. - The action definition in this file shoud adhere to the OpenWhisk deployment YAML specification.
- Once defined, the CLI uses this file to deploy or redeploy actions. You might see values like
$CUSTOMER_PROFILE_TENANTlisted under environments in this file. These are environment variables you can define in your.envfile. - The generated actions use CommonJS syntax: ES Module syntax is not supported by App Builder.
- In each folder, you should be able to see both the actions and the front-end code. You should also see
- `test` is for back-end action unit and integration tests.
e2eis for end-to-end tests.app.config.yamlis the master configuration file. It follows the same principle as the individualext.config.yaml, and compiles these individual file into one comprehensive config upon application build.libcontains all the shared utility actions across different extension points.package.jsondescribes project definition and various metadata relevant to the project. It sends information to npm that allows npm to identify the project and handle its dependencies. Learn more here..aiocontains config variables that are useful for the CLI to facilitate the app, for example, supported API services.- This file should not be committed to a source code versioning system.
- You can manually update the file or use the
aio configcommands to add or to remove configurations. Learn more about the Config Plugin.
.envcontains environment variables that are useful for the app during development, for example Adobe I/O Runtime credentials and Adobe Product API key, secrets, and other tenant specifics.- The environment variables defined here can be used in the application, for example in
ext.config.yamlandapp.config.yaml. If you've set up credentials for the selected workspaces, you should be able to see some of those values, likeAIO_runtime_authandAIO_runtime_namespace, prepopulated upon initialization. - This file is automatically included in
.gitignore. Because of the credentials and secrets it contains, it is not intended be shared.
- The environment variables defined here can be used in the application, for example in
6. Develop the application
6.1 Run the application
To run the application locally, use one of the following commands:
Copied to your clipboardaio app dev
This is the preferred method for local development. It will launch the application locally with support for these features:
- Web actions/sequences served via http
- Hot reload of actions on code change
- Hot reload of web source on code change
- Debug web browser JavaScript code in Visual Studio Code
- Debug web actions/sequences in Visual Studio Code
- Require-adobe-auth web annotation support
- Logging to console
Copied to your clipboardaio app run
To test functionality not supported by aio app dev, you can use this command to deploy actions to Adobe I/O Runtime while running the UI on your local machine.
Copied to your clipboardaio app run --local
This deprecated command will deploy actions to a local OpenWhisk instance, which the CLI will automatically download and install. The SPA will then run on the local machine. Note that users of Apple Silicon processors will encounter issues with this command, and should use aio app dev instead.
6.2 Accept the certificate (on first use)
If you are using this application for the first time, you will see a message similar to:
Copied to your clipboardsuccess: generated certificateA self signed development certificate has been generated, you will need to accept it in your browser in order to use it.Waiting for the certificate to be accepted.... timed out
This message appears because Adobe uses a development SSL certificate for secure communication. Understand more about the purpose of this certificate here. If you see this message, please navigate to https://localhost:9080, where you should see a screen like this:
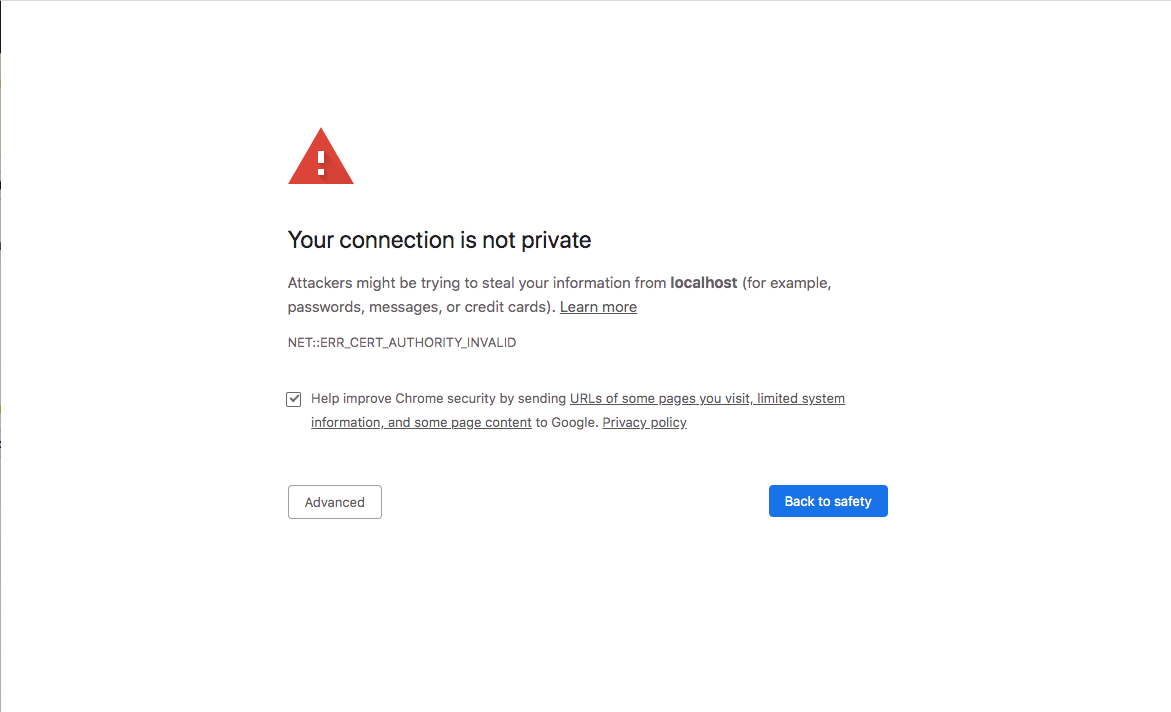
Click on Advanced. The next screen will vary from browser to browser, but should offer an option to Proceed to localhost (unsafe) which accepts the certificate.
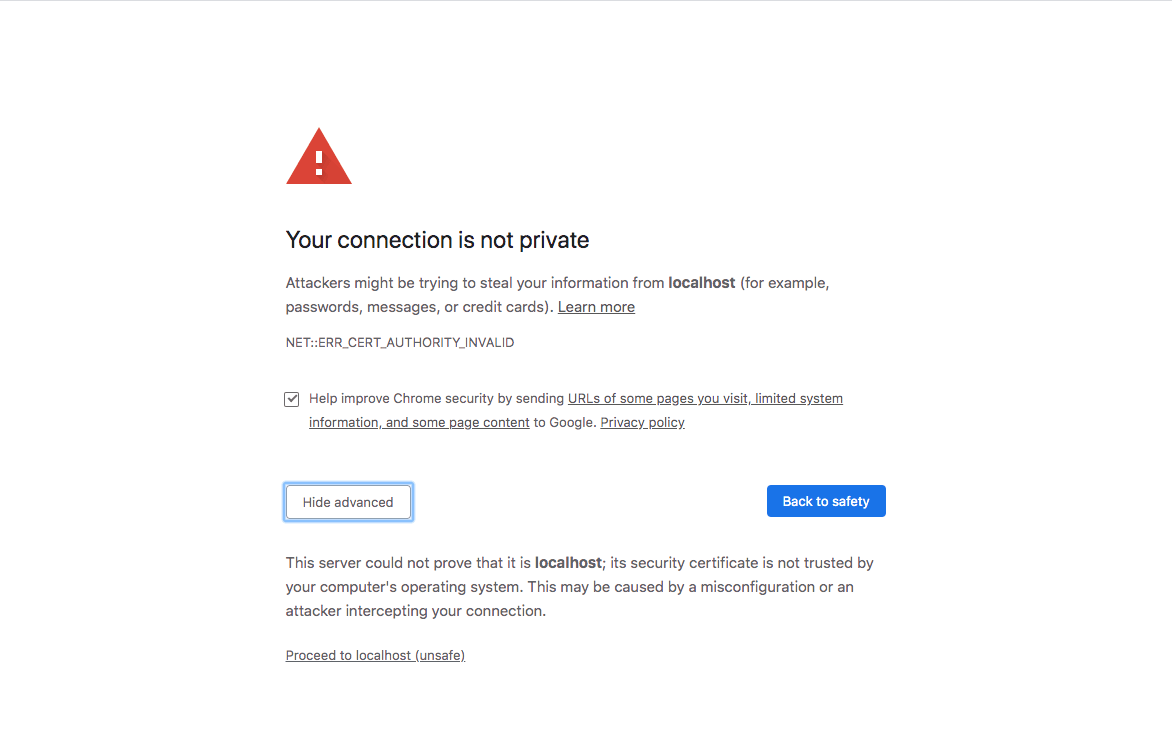
You may need to exit the current process and run aio app run again.
6.3 Proceed to the application on localhost
Users who accepted the certificate in the past should see the process shown below running in Teminal, with backend actions deployed to Adobe I/O Runtime or to the local OpenWhisk instance if the --local option was used.
Copied to your clipboard$ aio app run> Local Dev Serverℹ using remote actionsℹ redeploying actions........ℹ writing credentials to tmp wskdebug config '.wskdebug.props.tmp'..ℹ injecting backend urls into frontend configℹ starting local frontend server ..ℹ local frontend server running at https://localhost:9080ℹ setting up vscode debug configuration files..ℹ press CTRL+C to terminate dev environment
Two URLs are displayed:
Copied to your clipboardTo view your local application:-> https://localhost:9080To view your deployed application in the Experience Cloud shell:-> https://experience.adobe.com/?devMode=true#/custom-apps/?localDevUrl=https://localhost:9080
The first URL shows your standalone application on localhost (by default; the port is configurable). The second places your local application in the context of the Experience Cloud UI for preview.
While most changes in your code are updated in real time when the application is running, the .env file is not among them. Running the application depends on .env file to provide necessary credentials, so the file is unmodifiable while the app is running. When your app is running, the .env file is backed up, and a new one is written with specific values. When you exit the process, the original .env is restored.
As indicated in the message, when you are done, you can press CTRL+C to terminate the local development environment.
To have the application run completely locally, so the actions run on a locally deployed standalone version of OpenWhisk instead of on Adobe I/O Runtime, use aio app run --local. Some additional dependencies are required if you have not installed them already; see Optional tool section in Set Up Access, Environment, and Tools to set them up manually.
Usually, we recommend running your applications with deployed Adobe I/O Runtime actions, since your application should run on Adobe I/O Runtimein production. However, if you need to build complex actions or sequencing, the --local flag is helpful to debug the application locally. Please see the "Debugging the Application"" section below for more information.
6.4 Try the sample application
When you access https://localhost:9080, you should see the sample application deployed:
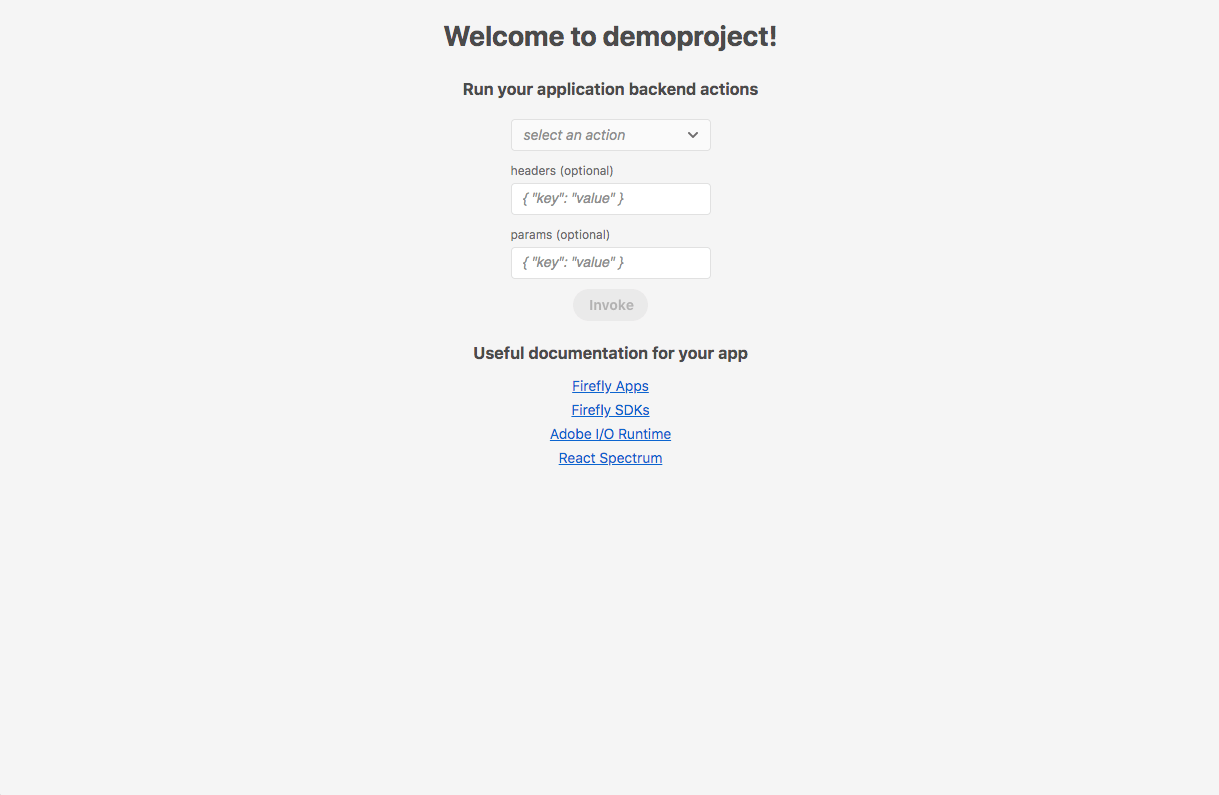
This simple SPA contains links to documentation and allows you to run your back-end actions for tests. Use the selection box to pick the action you'd like to invoke. You can also pass request headers and parameters from the corresponding input fields in the SPA UI.
All actions require Authorization and x-gw-ims-org-id in the headers by default. In your project code, navigating to app.config.yaml, will reveal that a require-adobe-auth annotation is set to true for all sample actions. Having this flag enabled enforces that a valid user token be used to invoke this action. We recommend having this enabled for security reasons. You can learn more about this in our Security Overview.
With the
require-adobe-authannotation set totrue, pass in a valid user token and corresponding organization ID to invoke the action. You can retrieve the token from your CLI by typing inaio login, and the org ID (look forsome_hash@AdobeOrg) from the workspace details on Adobe Developer Console or from the URL of Adobe Admin Console. Be sure to select the correct organization in the top right corner. You can also list all the organizations you belong to and their org ID from your CLI by typing inaio console org list.Put the token and org ID into this format:
{"Authorization":"Bearer <token_from_cli>","x-gw-ims-org-id":"<org-id-from-console>"}Go back to your browser and put the joined value in the
headersinput field. You should now be able to invoke actions that do not require additional parameters (likegeneric).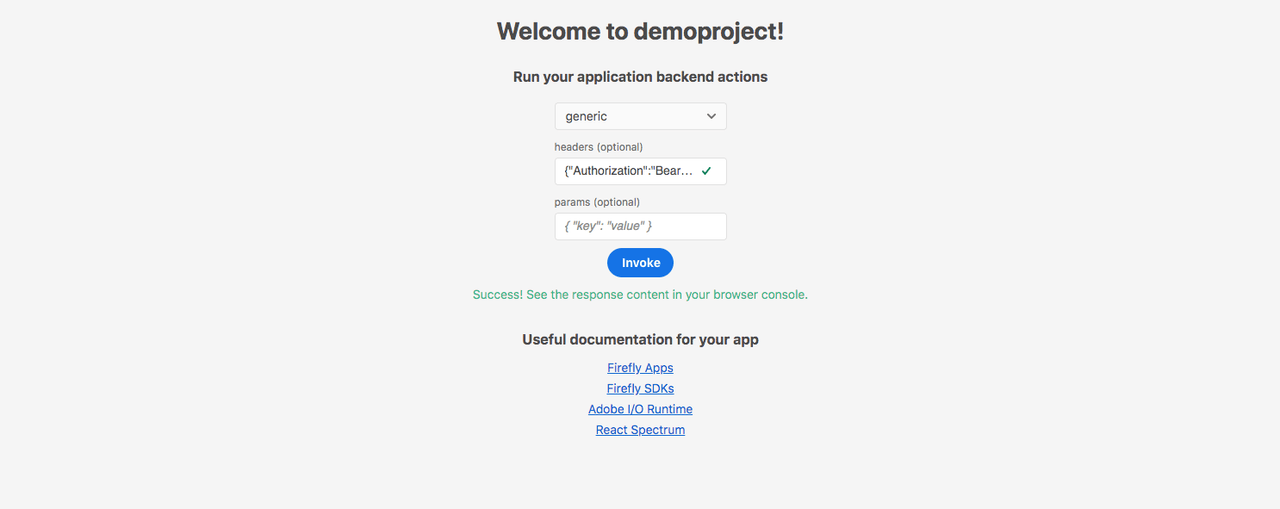
Note: If you open your application in the Experience Cloud Shell using the second link provided by the CLI, your Experience Cloud Shell user token will automatically be available to the SPA UI and passed to the underlying Adobe I/O Runtime actions of your application. This is a very useful feature of the SPA UI template, which integrates with the client-side API of Experience Cloud Shell.
The other sample actions require invoking additional paramaters. For example, if you try to invoke analytics with only the authorization header, you will see an error similar to "error": "missing parameter(s) 'apiKey,companyId'". This is because these sample actions use Adobe API that requires those parameters before the actions can be invoked.
- Each sample action requires different parameters: some need only an API key, some also requires the tenant ID or other information. Go into the action code in the
actionsfolder to learn more. - The API key is often required. If you have the service added in the current workspace, it is easily retrievable in the
.envorconsole.jsonfile. - Other fields, like tenant ID for Target and Campaign Standard or company ID for Adobe Analytics, are not accessible directly through the CLI. Please refer to product documentation to locate these value for your Organization.
- Once you have these parameters on hand, construct them in the expected format
{"key": "value"}and paste into the parameters. You should now be able to invoke the corresponding actions.
6.5 Debug the application
The CLI has a dev command (aio app dev) that supports debugging. You can develop and debug Adobe Runtime actions in your favorite IDE or debugger with a fast feedback loop. It features:
- Step-through debugging with lengthy timeouts - previously you could stop at a breakpoint for just 60 seconds
- LiveReload for web actions
- Instant logging output to Terminal
Please visit the Debugging App Builder Apps Code Lab to set up your local environment and go through step-by-step instructions.
If the local development is run (aio app run), the actions you call are run directly on Adobe I/O Runtime. When you use aio app dev, the actions are run or debugged directly in Node. In both cases your front end is run on localhost.
6.4 Retrieve application logs
6.4.1 Dev
When using aio app dev logs are output immediately to the terminal and not kept in an activation record.
6.4.2 Run or deploy
To see application logs after running aio app run or after running your deployed app (aio app deploy), use the command aio app logs. By default, only the logs of the latest activation are fetched. If you want to see a more extensive list of logs, use the --limit flag to define the number of recent activations to be fetched.
Read more at Managing Application Logs.
6.5 Test the application
The bootstrapped application comes with sample implementations for both unit and end-to-end tests. You can execute these tests locally using aio app test or aio app test -e, which will run the unit and end-to-end tests, respectively, against the bootstrapped codebase.
As you modify and extend the application code, you will need to update the tests accordingly.
Adobe uses jestJS for the unit tests of the CLI, SDK, and bootstrapped application. You can change the implementation to your preferred framework.
CI/CD for App Builder Applications explains how you can also execute these tests in the context of a CI/CD pipeline.
7. Deploy the application
Once the application is in a good shape, it can be fully deployed to your development workspace. This requires a single command:
Copied to your clipboardaio app deploy
The command may take a minute or two as the CLI is building and deploying behind the scenes:
- The actions defined in
app.config.yamlinto Adobe I/O Runtime - The front-end built files and assets into the Content Delivery Network supplied with App Builder
The CLI output details this process:
Copied to your clipboard> Build actionsℹ dist/actions/analytics.zip...> Build static filesℹ dist/web-src-prod/index.html...> Deploy actionsℹ Info: Deploying package [demoproject-0.0.1]......> Deploy static filesℹ index.html...Your deployed actions:-> demoproject-0.0.1/__secured_analytics...To view your deployed application:-> https://<namespace>.adobeio-static.net/<packagename>/index.htmlTo view your deployed application in the Experience Cloud shell:-> https://experience.adobe.com/?devMode=true#/custom-apps/?localDevUrl=https://<namespace>.adobeio-static.net/<packagename>/index.htmlWell done, your app is now online 🏄
Note the last section of the output, To view your deployed application, shows two urls of the app by default, for the CDN host and Experience Cloud Shell. In the latter case, The URL format of the app should follow https://experience.adobe.com/?devMode=true#/custom-apps/?localDevUrl=<your-app-url>.
You can undeploy your app with aio app undeploy. To learn more about deployment, please refer to the Deployment Overview. To automate your build, deploy, and build process with out-of-the-box CI/CD GitHub actions, please refer to CI/CD for App Builder Applications.
8. Common issues
Please first make sure your CLI and all plugins are up to date. For the CLI, you can check the version through
aio -vand compare it with thenpm show @adobe/aio-cli version. If your CLI is outdated, update it by runningnpm install -g @adobe/aio-cli. After that, you can simply runaio updateto ensure all core plugins are updated.If you see a validation error, you did not pass in an authorization header to an action that expected one. See
Trying the Sample Appsection above, or learn more about this in our Security Overview.Copied to your clipboard{"error": "cannot validate token, reason: missing authorization header"}If you see a missing parameter error, you did not pass in required parameters to an action that expected one. See
Trying the Sample Appsection above.Copied to your clipboard{"error": "missing parameter(s) 'apiKey,companyId'"}`
Next steps
For more code examples and use cases, please refer to the Resources page.
Continue the tutorial at Publishing Your First App Builder Application
